Before I leave to teach a full day of classes (EPP block of the month and Star Hexies by machine), I wanted to announce the winner of Edyta Sitar's book!!! Random Number Generator came up with No. 2 which is Lisa Marie!
Lisa, I emailed you for your mailing address. Thank you to everyone who replied and most importantly taught another person something new.

Let the favor of the Lord our God be on us; establish for us the work of our hands— establish the work of our hands! Psalm 90:17
Saturday, February 28, 2015
Friday, February 27, 2015
Bzzzzzzzzzzzzz - Giveaway

The birds are screaming this morning. I put out a new suet feeder yesterday and the party has begun! They are so fun to watch. On Monday, I couldn't help myself and worked in the flower garden and the bees have arrived! I guess the scents of the flowers have them searching out fresh food. I've been busy as a bee as well making free-form bees for my students taking my EPP Mystery Block of the Month. You never know when the teacher will be gifting goodies that can be added to a future block. :)
Okay, today's the day to leave a comment if you would like to win Edyta Sitar's Friendship Strips & Scraps book. In the comment section, please let me know what you have taught to another person whether it be online via a blog or in person. Please make sure I have a way to get a hold of you should you win. Only one person wrote a few weeks back about the giveaway. I'm hoping that there are others interested as well, but perhaps everyone has already purchased this particular book. It is an awesome one for sure. I will draw a winner tomorrow morning before I leave to teach.
Good luck!
Tuesday, February 24, 2015
Mystery EPP Block of the Month & GIVEAWAY

I can hardly wait until Saturday to to see all of the color variations of January's block. Once everyone gets January's and February's blocks done, the comfort level of working with the three shapes will be easier and easier. My mantra for the year is FUN, FEARLESS, and FANTASTIC. We are working with the following shapes: hexagon, triangle, and diamond. The blocks are created and then appliqued on either a light or dark background fabric. Some students in the class are planning on using both light and dark backgrounds in the quilt. How fun is that! I'm sticking with the light background on mine but will utilize the dark background fabric in the borders.
Stay tuned....I'll post pictures after the class.
It is so Spring-like here in Oregon and everything is in grow mode and blooming. Today, we may reach 65 degrees! If we have the cold spell they are expecting mid March, it could be devastating. I heard that the local growers are already separating plants in an attempt to avoid massive losses. Not sure what I can do here at home, but I was gifted some large recyclable bags from my local pet store today so I have enough to at least cover my blueberry plants if needed.
Monday, February 23, 2015
Recipe Monday - Home Rendered Lard

Are you still there? Okay—good, at least I didn't scare everyone away. Join me in an in-depth look at rendering homemade lard. It's not as bad for you as you may think especially when you purchase high-quality fat from your local butcher. My butcher's meat is the best quality, and the animals are from smaller farms that take great care in feeding organically. Ask before you buy!
If you are under 45 years of age, you most likely are cringing now at the mere mentioning of the word lard. The word itself does sound pretty icky I admit. The name has been vilified and we've been taught its an unmentionable because in order to be healthier we should all focus on low-fat options. Home rendered lard and its poor unappealing name actually isn't as bad for you as you may think. It is an excellent source of vitamin D. It has no trans-fat which are truly the fats that everyone needs to avoid. But, don’t believe anything unless you do the research yourself which I hope everyone will do. Just make sure that your research is on home-rendered lard not the toxic stuff you buy at the grocery that has been zapped with all those chemicals that allows it to stay on the shelves indefinitely.
Finding quality pork fat is a bit harder than you may think so don't give up if your first venture to obtain it leaves you empty handed. I actually felt a little silly calling around to butchers and asking for pork fat and then saying that I needed either the back fat only or leaf fat. I was afraid that they wouldn't know what I was talking about or worse – some crazy lady wants to buy fat (as all the workers are laughing uncontrollable). The first place I called said they had it and I drove down all excited. When the butcher brought it out, I noticed that there was an awful lot of meat on it and it made me pause. I asked him “is this pork fat that is from the back only?” His reply was no, it is just fat that we cut off the meat. But what meat I asked? All meat was his reply to which I politely said no thank you that I needed it to be from one animal and it needed to be from the back of the pig.
In Portland, you can purchase it at Gartner’s Country Meat Market. The staff there is always friendly and the shop displays their goods beautifully. I could have easily bought one of everything it looked so good. I asked for the pork fat and the young man came back with a 5.5 pound of the most beautiful, white fat that I've ever seen. I asked him are you sure this is just pork fat and that it is from the back. He simply smiled and said absolutely and that they keep it on hand all of the time because it is very popular. YEA…I’m not weird after all. Other people buy it too!
Note: If you are able to get leaf lard, it is your first choice for the pork fat. It is the fat that surrounds only the kidneys.
Let's get started!
My lard was frozen when I got it. By the time I got back home, it had thawed just enough that I could break it apart with a strong knife. Be careful as you continue to do this because as the fat thaws it gets slippery. If it starts to get too much at room temperature, just put in into the freezer for 20 minutes or so while you continue on with the still frozen pieces.
Ingredients: 3 to 6 pounds of pork fat (back or leaf)

Prep
Work:
· In large pot, fill it up with water and insert ball jars.
You will want to boil the jars and then keep them hot. Never put hot
liquid into a cool jar or the jar may break!
· I used two glass measuring jars, cheese cloth, and one mesh
strainer.
Steps:


4. Turn heat on. Initially, I put the burner on medium until it started bubbling a little and then I turned it down to low. You do not want to scorch your beautiful fat so leave it on low.

5. Stir fat often. I probably did this more than I needed to but it was fun to watch the process.
7. Once you get a clear, pretty liquid on top you can start removing the fat and putting it in the jars that you have already simmering in hot water. I removed one jar and used a paper towel to dry the inside of the jar.


8. Dip the clear fat from the pan and into the first glass measuring jar that has the strainer on top and cheese cloth lining the strainer. I strained the liquid twice because I wanted to eliminate anything getting into the jars but pure fat, but you don’t have to do the second straining if you don’t want to. The spoon I used held ¼ cup so I was able to fill my jar pretty quickly. I think it took only 4 dips.


9. Put the jar into the freezer for about 30 minutes. You will want to cool the fat as quickly as possible. This makes the lard better and smoother. As it hardens the liquid will turn a beautiful white. I numbered my jars so that I would be able to tell which jar would be the purest for baking. I ended up getting 5 jars plus just a smidge more (three that were nearly pure white and the last 1 1/4 jars were a savory golden that will be great for non-baking recipes.


Lastly, I wanted to also say that before I started I worried that the whole house would smell like pig. You know how bacon can really smell up the house. Instead, the smell was kind of a warm, meaty smell – not bad at all. The smell did increase at the end of the process but dissipated very quickly. It was late in the evening (past 10 p.m.) when I finished and by 5 a.m. the next morning, you couldn’t tell I had cooked anything.
I hope you enjoyed following my lard rendering adventure.
P.S. Eating biscuits made with your home-rendered lard is an experience you and your family will treasure for years to come. The lard you make at home is at its purest form and impossible to get anywhere else but from your own kitchen. As in most things, Purity Matters, but even more so with lard.
Bon Appetit!

Friday, February 20, 2015
For the Love of the Piecers

Orphaned quilt blocks are found nearly everywhere and when I find them I like to ponder what the Piecer's vision was for the blocks. Did she or he use scraps of fabric that had a special meaning, or were the fabrics chosen based on a planned color theme? Were the moments spent in stitching thinking of how beautiful the finish would be, did the piecing help him or her get through some difficult times, or was she or he thinking of the smiles on the face of a person who would be receiving the finished quilt? Did the years pass as quickly by for them as they do for me? And before you know it, decades have passed but the blocks ever so patiently wait for you.
The above quilt was worked on for decades by the same person. Her name was Ann and she, as all us Piecers do, worked on and finished many quilts during that same time. This one however was never quiet ready for the finish line. She had just enough done that I could envision where she was planning on going, and with a tender heart, I laid out the blocks and strips on the floor...arranging and rearranging until nearly all of the blocks were used. I thought she was so creative by adding in the purple diamonds among the flowers. And just like we all have done, she had at one point ran out of the purple fabric and when she went to buy more, the exact same purple was not available so she did as we all do --- picked another purple and kept on going, and you know what? It worked just fine.
Here's a picture after I had joined all of the blocks together into the final top. The symmetrical side of me so wanted the left and right sides to match but there wasn't enough blocks. I contemplated leaving off the left diamond side but then it just didn't feel right and I think I actually felt Ann's whisper of it's okay that it doesn't match. I also could not make myself cut off one piece of the top as you see it so I floated the top onto a background fabric that closely matched the cream fabric and appliqued the whole top to it. LOL. Let me tell you, I love a good challenge, but I paced the floor trying to decide how I was going to accomplish what I had just decided to do. It was a little overwhelming, but I took my time and sewed inch by inch until I made it all the way around.


Monday, February 16, 2015
Recipe Monday - Chinese Pork Dumplings
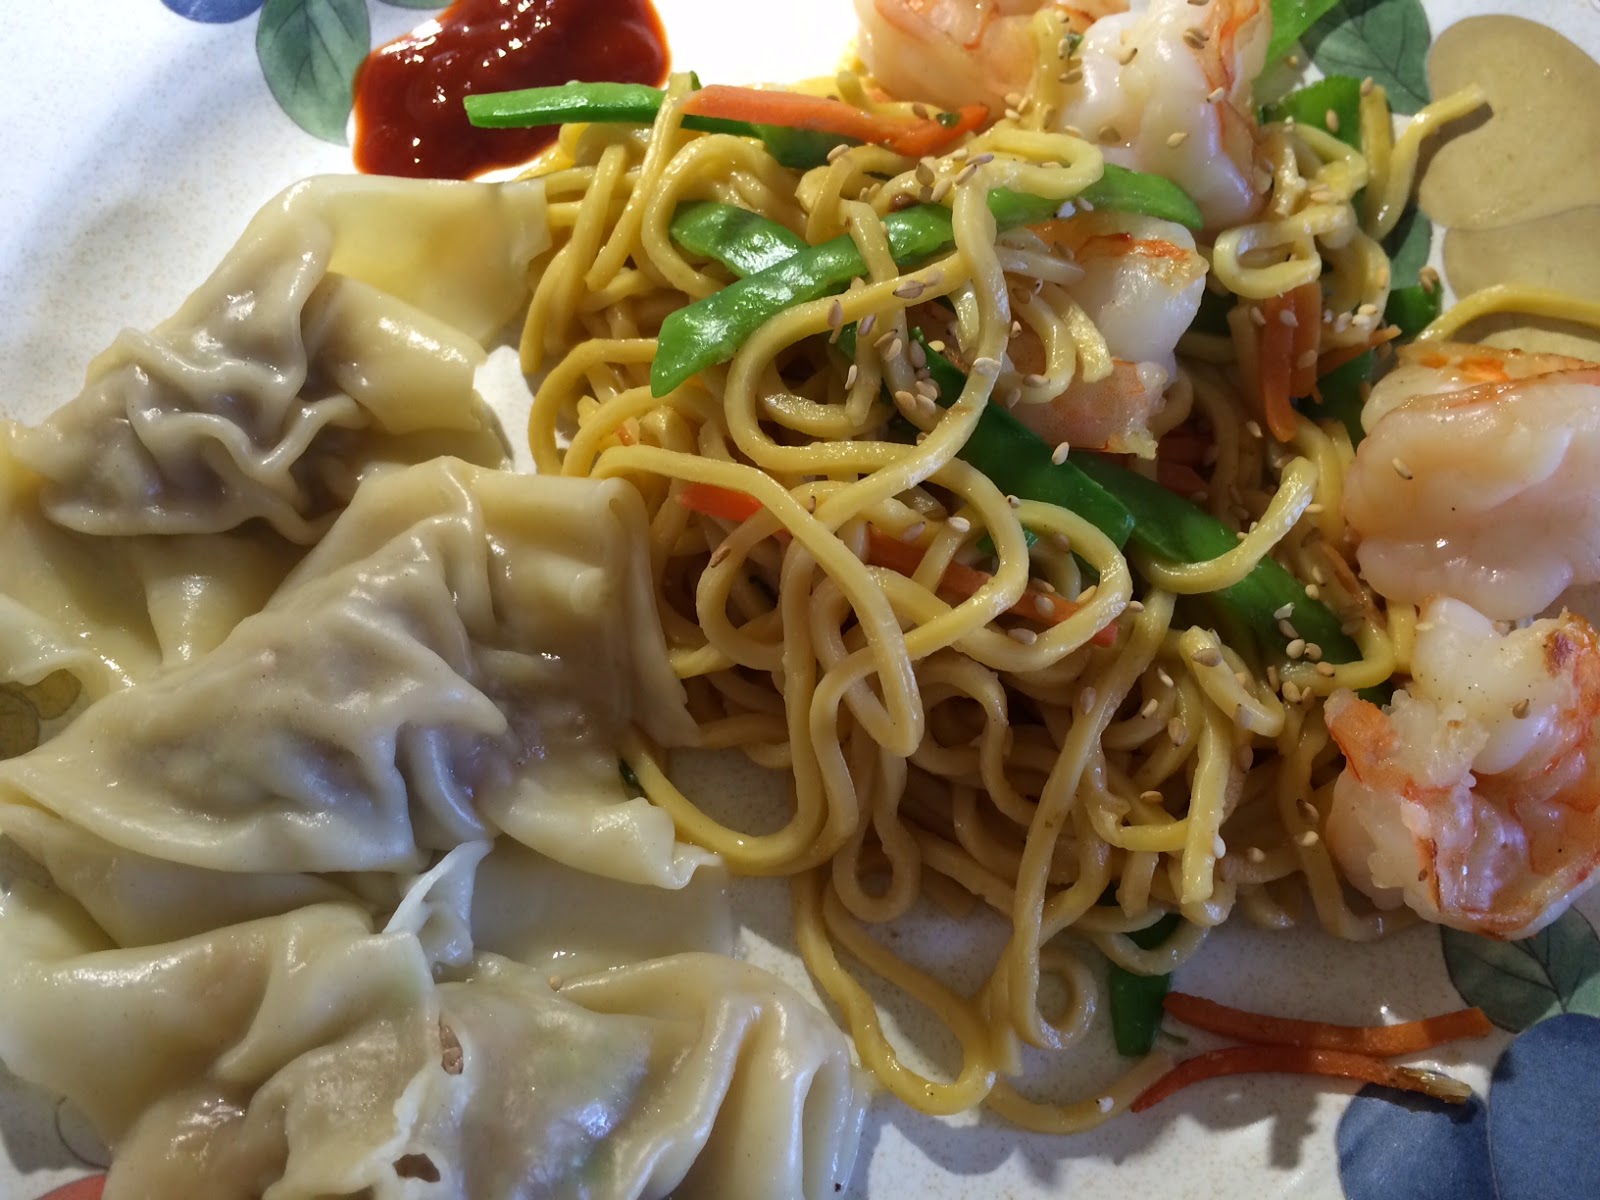
For my first dumplings, I did the easy thing and purchased pre-made wrappers from our local market. I was really impressed with how easy they were to use. I had read stories about them being difficult but these must have been really fresh because it was really easy and fun making the dumplings. The outside of the wrapper says: Mandarin won ton wraps.
I tried to follow most of her instructions but did vary a little.
Ingredients:
- 3/4 pound ground pork
- 2 cups of chopped bok choy cabbage
- 1 tablespoon finely minced fresh ginger
- 1 teaspoon kosher salt
- 1/4 cup finely chopped green onion
- 1/8 teaspoon ground pepper
- 1-1/2 tablespoons light soy sauce
- 1 tablespoon of Shaoxing rice wine *see note
- 2 teaspoons sesame oil
- 1 package wrappers
Directions:
- Put chopped cabbage in food processor and pulse several times until finely minced. You can do this by hand as well.
- Place minced cabbage in strainer and sprinkle 1 teaspoon of kosher salt on top and allow to sit for at least 10 minutes.
- Place ground pork, ginger, green onion, pepper, soy sauce, rice wine, and sesame oil in processor and pulse several times OR mix all ingredients in bowl well to incorporate.
- Next is to squeeze as much water out of the cabbage as possible so it doesn't make your dumplings too wet. I grabbed a hand full of cabbage and squeezed as tightly as possibly and then dumped the cabbage into the pork mixture. Repeat process until all cabbage has been squeezed and added into the pork mixture. I thought it was amazing how much water came out of the cabbage so don't skip this step!
- Stir mixture well until all ingredients are mixed well.
Preparation:
- Put a small container of water in front of you
- Place some freezer paper on a large baking tray
- Just slightly dampen a large cotton tea towel
- Grab a teaspoon or tablespoon
Now you are ready to make your dumplings. (see pictures below)
- Place about 1 tablespoon of filling onto center of dumpling.
- Dip your finger into the water and run along the bottom side of the dumpling.
- Bring top of dumpling over the filling and press onto the side you just dampened.
- Press the edges well working to make sure you have no air bubbles left inside. If you find you are having problems with the sides staying together, you can add a little bit of corn starch to your water to make it more glue-like.
- Place dumpling on baking tray and cover with slightly dampened towel.
- Continue making dumplings until all mixture is gone.
Cooking Directions:
- Put water in a large pot and fill half way up with water. Bring to a boil.
- Add dumplings one at a time and using spoon don't allow the dumpling to sit on the bottom of pan or it will stick and break open your dumpling. It only takes about 5 seconds of movement and then you can allow it to cook without fussing over it. Don't put too many dumplings in at the same time as they need to be able to move freely.
- Cook dumplings on a gentle boil for 8 to 9 minutes.
- Remove dumpling with a slotted spoon allowing water to drip off and then place in serving bowl.
Serve with your favorite dipping sauce. These have a fantastic flavor and you may end up having to cook a few more. I did!
Note: I had a hard time finding Shaoxing rice wine until I listened to my husband and went to the wine area of the Asian market. I was convinced it should be where the vinegars, sauces were located. I'm so glad he was with me or I would have not had that ingredient. She says that dry sherry can be substituted but I wanted the traditional flavoring.
Bon Appetit!


Wednesday, February 11, 2015
Custom orders & "Can you pick that out?"

A customer recently requested that I add some embroidery to an item that had special meaning attached to it. It had extensive embroidery already on it and quiet a bit of the sides was unraveling. And, in an effort to help me, they picked out all of the embroidery that was in the center area where they wanted something else embroidered. The material is a very lightweight velvet-like fabric. The removal process left a shadow outline of what had been previously embroidered, and to make it more difficult the weave of the fabric now had open holes everywhere. I tried hard to keep my face from contorting into a grimace while I listened to the wants and needs of the customer. If it had not been for a 90th birthday for a dear friend of theirs and that the item meant so much to them, I would have turned the job down because there was no way I could make this look new and perfect.
Now what to do to make it better..... I started by completely removing the damaged sides from the panel. Next, I trimmed the top of the panel to match the bottom. I used tracing paper to make a template of the center area and cut out a new piece of fabric from one of the side areas that I removed. I embroidered the "90" on it, and then appliqued it to the damaged area using a small zigzag stitch and mono-filament thread. I then embroidered the Happy Birthday wishes on it and hemmed the top and sides. The customer was happy with how it came out, but I sure don't want to do another job like this one.
Moral to the story is whether you do embroidery with a commercial machine like I do or you use a home embroidery machine, the process of embroidery is the same. Embroidery just like a tattoo that you get on your skin is not easy to remove, and the removal process may leave scars that are difficult if not impossible to fully hide. Nearly always, it will be worth it to just start from scratch on a new garment.
View from the back shows how the weave of the fabric broke down. Click on pictures to enlarge.

Customer panel. Both sides were damaged.


Monday, February 9, 2015
Recipe Monday - Hurry-up Chicken Soup

To make this meal even easier, buy a whole baked chicken from your local store. My favorite place to buy a whole baked chicken is Costco. They don't add a lot of foo-foo flavorings, and the cost is nearly the same as for a raw chicken.
The first night we had sliced chicken with some veggies. After your meal, remove the meat from the bone. I also remove the skin to reduce fat. I'm always surprised how much meat there is on what looks like a fairly small chicken. I then go one step further after removing the meat. I separate some of the white meat and use it to make chicken salad for a few lunches. The rest of the white and dark goes into the soup.
What's in your fridge? If you don't want to be surprised by forgotten food in your fridge, it's always good to go through it every 3 or 4 days and choose what needs to be eaten. Some of the best meals are made with leftovers. In my case, I had a small bowl of sticky rice and a half of a large onion that needed to get used. Add in a little celery, spices, and vegetable broth, and you have a savory meal that will warm you up even on the coldest of nights.
Hurry-up Chicken Soup
Ingredients:
- 32 ounces of vegetable broth (or chicken broth)
- 1/2 of a large diced onion
- 2 stalks of thinly sliced celery
- 1 cup of sliced carrots
- 1 Bay leaf
- 1-1/2 teaspoons pepper
- 1 teaspoon salt (or to taste)
- 1 T Italian Seasoning
- Leftover chicken chopped
- Leftover rice (sticky rice helps to thicken the soup)
Directions:
- Add broth to medium sized stock pot.
- Cut up onion, celery, and carrots. Add to broth.
- Add in bay leaf, pepper, salt, and Italian seasonings.
- Bring mixture to a boil and then add in chicken and rice.
- Reduce heat to simmer, put lid on pot, and set timer for 30 minutes to an hour.
- Stir soup occasionally.
- Remove bay leaf from soup.
Enjoy!
Bon Appetit!
Thursday, February 5, 2015
Craftsmanship through the Decades & Challenge!
 |
| Now that's WEARING happy colors! |
It's wet, chilly, and dreary this week where I live in Oregon, but life is great. I have all the conveniences and benefits of living in the 21st century. Today, I pulled out a small booklet that my mother-in-law found and gave to me called Grandma Dexter, Applique and Patchwork Designs. The cost on the worn little booklet was only 10 cents. As I gently leafed through the pages, I felt a connection to all the women (and men) who came before me in working with fibers.
After doing some research, I learned that the booklet was most-likely published in the early 1930s. I cannot imagine how difficult it was to live during the depression. I like to think that receiving this booklet brought a little joy to someone if even for a little while. The designs and ideas in the book are happy looking. The first page has six different Sunbonnet Sue's doing different things. Yo Yo pillows were popular as well as pot holders. I was surprised to also see rug hooking kits for sale (everything incl.) 89 cents!
The next several pages were full of color pictures of blocks such as the Eccentric Star, Sunflower, Modern Tulip, Flower Basket, Sweet Pea Wreath, Oriental Star, Dublin Steps, Triangle Puzzle, Colonial Bow Tie, Jacobs Ladder, Building Blocks, and Flower Pot. Templates follow the designs so that you can trace them out and start making them right away. This particular booklet still has the envelope and order form inside it should the person receiving it wanted to order supplies. Times sure have changed because at the bottom of the form it says "If cash is sent in payment be sure to register your letter). Wow.

They even listed a recipe to stiffen it:
- Dissolve 2 teaspoons of sugar in one-third cup of water, dip bouquet and leaves in this solution and press out liquid. Straighten flowers and leaves carefully and let dry.

So what do you do with your hands that makes your heart sing? Now let's continue to do it, but don't forget to also teach someone what you do so that each new generation will know the joy of creating, and you never know...that passing on of knowledge/skill might just give another person the ability to make a living income.
If you've read back on my posts, you know how I feel about the connection of hands. Many hands working together can do anything. Now that we can touch anyone, anywhere via the internet there is nothing that cannot be accomplished if only we reach out to another.
Which brings me to "THE CHALLENGE" and the REWARD for accepting the challenge.
Leave me a comment on this post letting me know that you are willing to teach another person(s). Please post what you will be teaching. It can be whatever you like to do and have a passion for doing. Saying it out loud or in this case writing it, will make it more real for you and me.
Now ask a person if they would like to learn what you have to teach. Ideally, teaching would be wonderful if we could always meet face to face, but teaching something new on your blog will work as well as long as you call the title of you blog -- Passing it On and link back to this post on my blog.
Are you willing? Can I hear an Oh YEAH out there. Doesn't it sound like fun and it will bring you and others joy I promise. You might just find out that you teaching as much as doing.
The Challenge is open until Friday, February 27, so you have plenty of time to complete it and be eligible for the gift. Please come back to my blog on the 27th. I will have a new post just for the Challenge. If you taught your skill person to person, awesome! Just let me know that in the comment section. If you taught your skill via your blog, please post the page on your blog so I learn from you too! I'll draw the winning name on Saturday, February 28 and post the winner. Please make sure I have a way of contacting you. If your email is hidden and you win, I cannot tell you or mail you your prize!
Oh yeah -- that brings me to my gift to one of you willing to take on the challenge. It is a brand new book by Edyta Sitar called Friendship Strips & Scraps. It was published in 2010 but the book itself is brand new and has that new book smell....yummy! Edyta is a fabulous teacher/person and what better way of saying thank you for teaching, then rewarding someone with this book.

This Challenge is open Worldwide. I will ship anywhere.
Monday, February 2, 2015
Recipe Monday - 'Pork' It's what's for dinner!

We have a Hawaiian restaurant in Portland that has the best Kalua pork. Mmmmm....just thinking of it makes my mouth water. I've been on a quest to see if I can reproduce it at home using my crock pot. This recipe is versatile because it is yummy coming right out of the crock pot. However, it is equally as good if you grill some onions, add in some teriyaki sauce, or even barbecue sauce. It is the dish that keeps on giving!
I think the following recipe gives you that same succulent, slow roasted, smokey island-style pork flavor without all the work of actually digging a hole in the ground in your backyard. Not to mention trying to find banana leaves to wrap that pig in.
Sylvia if you are reading this, please let me know if this comes close to your mom's yummy recipe. I didn't add the shredded cabbage you recommended this time, but I will definitely do it next time.
You do need Hawaiian sea salt for this recipe and it is not readily available in our traditional grocery stores. I understand that Trader Joe's and Whole Foods carry it. I got mine at New Seasons. However, if you don't have any of these stores near you, you can order it off of Amazon.
Safety note: There is a difference between a slow cooker and a crock pot. While I've seen recipes that advocate using a slow cooker for recipes like this, the manufacturer does not recommend it. Slow cookers cook at a really low heat and sit on a heating tray. They are not recommended for large cuts of meat like the recipe below.
Now that we have that out of the way -- are you ready? Okay then, let's do it!
Kalua pork
Ingredients:
- 1 (3-1/2 pound) boneless pork butt roast (also known as pork shoulder)
- 2-1/2 teaspoons Hawaiian sea salt also known as alaea sea salt (no substitutions here please)
- 2 teaspoons liquid smoke flavoring (I like Stubb's Liquid Smoke)
- 1 large banana
- 1 cup water
Directions:
- Using forks, pierce the pork all over.
- Place meat in crock pot.
- Rub the Hawaiian salt all over the meat then follow up with rubbing the liquid smoke all over as well.
- Wash the outside of a banana, cut off a little of each end, slice down the center but "leave banana intact and inside of the peel."
- Place banana on top of meat.
- Pour 1 cup of water into crock pot.
- Cover and cook on LOW heat for 10 hours, turning once during cooking time.
- Remove banana and throw away.
- Remove meat from crock pot and place on plate to cool for 30 minutes.
- Remove broth from crock pot and place in heat safe container and place in freezer to cool.
- Pick off fat from cooled pork and put chunks of pork back into crock pot.
- Unconventional instructions here -- Using a handheld blender, slowly shred meat with blender blades. This works beautifully and takes 1 minute versus 15 using forks.
- Remove broth from freezer and skim off all fat from top.
- Optional: I like to strain the broth next but you don't have to. I use cheesecloth and pour the broth through it.
- Pour 1/2 to 1 cup of strained broth back into shredded meat to moisten.
- Now taste it! Get that smile off your face! Do you need more salt? If yes, add 1 teaspoon more or to taste of Hawaiian salt and stir meat.
- You can now turn crock pot back on low for 1/2 to 1 hour to warm it back up.
Try not to let family see you sneaking bites.
Add some sticky rice and a macaroni salad to your plate and you have a Daily Grind that will have your family singing you praises!
Bon appetite!
Subscribe to:
Posts (Atom)