Pages

Tuesday, August 9, 2016

It's time to request your World Passport!


In my last post, I mentioned at the end of my post about an adventure that I am in the process of mapping out. We will travel the globe all from the comfort of your home. There will be many souvenirs for you to make. I'm in the process of designing them now.

It's going to be a great time, and I am excited to be your tour guide. We will start off in my own state (Oregon), and preboarding is September 1.

However, before you can travel, you 'must' first request your personal passport. Each month, I will add a link-up post where you will add your post so that others can see your finished souvenir. Each traveler that finishes their souvenir and participates in the link-up post will receive a a stamp for your passport.

As I mentioned in my last blog post:
  • we will visit lots of places (techniques) 
  • we will take part in many sights and sounds (fabrics/sewing)
  • we will savor the tastes (quilting) from each of the places we visit
The cost for admission has only two requirements: 
  1. Become a follower of my blog 
  2. Leave me a comment requesting your passport. 
Please include your email address in the post (many people cannot be responded to because your email is not shown). I can't send your passport if I don't know where to send it!

If you left a post on the last post, you do not have to repost your information again.

Thursday, July 28, 2016

Practice, Practice, Practice (in everything we do)

We hear this often don’t we? What we typically do not do however is that which we know is right, which is to practice. The above picture was me playing with hexie shapes joined by two triangles and coloring them in with crayons. I took a picture because the camera always give me a different perspective. Then I got to playing in the software getting different effects and loved how the practice piece turned out.

Practice is definitely a lifelong journey in itself. I have noticed that if I don’t participate in practicing, I quickly lose my edge. Things that previously came easily now have to be thought out or worse, redone merely because I have forgotten how to do it.

And then I had a lightbulb moment while reading Romans Chapter 8 this morning. This enlightenment was definitely a gift from the Holy Spirit. I have been diligent (read “practicing”) in my Bible studies and must have been sensitive to receiving it.  I wish I could say I’m always sensitive to hearing God’s leading, but I’m not. I'm definitely a WIP.  :)  There’s that practice thing again! But back to the moment I mentioned. Are you ready for it?

Life is one big tournament of practice! The outcome of the tournament is a direct reflection of how well, how often, and how dutiful you are to practicing.  Now I have to say right now in case you are new to my blog and don’t know me. I am a believer in Christ Jesus. I believe that God sent His son, Jesus who knew no sin to be sin for us, that we might become the righteousness of God in Him. We truly have an awesome God! The reason I state that I’m a believer of Jesus Christ is that all the work and practice I could do at anything in my entire lifetime would not be enough to enter into the one place I most definitely want to live eternity in…..Heaven. I first had to accept Jesus Christ as my Lord and Savior. After receiving His forgiveness, I was positioned properly to set up my lifelong practice mat.

Do you have a place where you document the things you desire to be the best at?

A few of mine are: (1) Being a Godly woman (this is truly a daily, moment by moment, continual practice), (2) Appreciate and honor the joy of being a wife to the person that I truly love and adore with all my heart and to bring joy and love to my husband and peace and beauty to our home, (3) be proficient at cooking delicious, homemade, healthy meals for my family, (4) excel at being a business owner of an embroidery shop and quilting teacher, and (5) being a forgiving, honest person and friend. This list is a living, breathing list that adjusts as life is lived.

Thank you if you have read this far. I appreciate your visit and would like you to invite you to join an adventure with me. Everyone loves an adventure, don’t they?

I will be your tour guide during the adventure. We will visit lots of places (techniques) and we will take part in many sights and sounds (fabrics/sewing) and will savor the tastes (quilting) from each of the places we visit. You will be shown videos of particular places before we jump on the boat so that you have a basic knowledge of where you are going before you get there. No one will get lost because I am the tour guide and I’m very confident in my ability to guide you through our adventure. I will have practiced everything beforehand so that you can enjoy every moment knowing that you are in good and capable hands. Because this is an adventure that is available to anyone regardless of a person’s ability or knowledge base, the price of admission is set very low. So low in fact, that there is no reason that anyone would refuse. 

The cost for admission is two-fold: (1) that you become a follower of my blog, (2) post a comment below letting me know you would like to order your passport. Please include your email address in the post (many people cannot be responded to because your email is not shown). I can't send your passport if I don't know where to send it!


Get your sunscreen ready -- We are nearly ready to board!

Thursday, July 7, 2016

Barn/Chicken Coop Quilt Block

Here's my version of a Barn Chicken Coop Quilt Block!

The girls home needed a pick-me-up because our Oregon winters had really beat it up. The original paint we put on it really showed its age.

My Mariner's block had nearly disappeared which believe it or not, I had not really noticed until I started repainting it with new colors and fresh paint. This time around, I took the extra step of applying two coats of varnish on it hoping to extend the life a few extra years. I love the updated look, and I think the girls do to.

Hubby redesigned their play area so that we wouldn't have to trudge through the play area to get eggs. Now that they can't get to the front of the coop (front porch area), I got to plant ground cover surrounding the stepping stones. Guess what! That area is so rich that the plants have already doubled in size. Who needs fertilizer when you have chickens.

I haven't been able to get much sewing done but redoing the block on their coop counts too -- right!

Wednesday, July 6, 2016

Red, White, and Blue Bundt Cake

This year we enjoyed a bounty of raspberries and blueberries. After making raspberry jam, I had to come up with something new to use up some more. I found this recipe on Facebook and modified it to make it a little more friendly for my family. Besides, who doesn't enjoy warm cake! You could use all blueberries, but I tossed in a handful of raspberries that I froze for just a bit just for tartness and to add some red.

Ingredients:
  • 3 eggs
  • 1/2 cup butter
  • 2 cups of white whole wheat flour
  • 1 cup of unbleached white
  • 1/2 cup of Spelt flour
  • 2-1/4 teaspoons of baking powder
  • 1/4 teaspoon salt
  • 1 teaspoon cinnamon
  • 2 tablespoons lemon zest
  • 1-3/4 cups sugar or sugar substitute
  • 4 cups of blueberries (I like to freeze the fresh berries so they hold their shape)
  • Handful of frozen raspberries (freeze the fresh berries)
  • 1-1/4 cups milk
  • 2 tablespoons superfine pure cane sugar
Directions:
  1. Preheat oven to 325 degrees (Fahrenheit)
  2. Allow butter to soften and come to room temperature. Allow eggs to warm up as well or run under warm water and then allow to sit for a few minutes. 
  3. Sift the flours, baking powder and salt together. Add lemon zest to flour mixture.
  4. In a large bowl, beat the sugar and butter with an electric mixer until mixture is well combined. Add eggs one at a time until incorporated into sugar/butter mixture
  5. Stir blueberries and raspberries into flour mixture.
  6. With a spatula or wooden spoon, gently stir in blueberry/raspberry mixture into butter/sugar mixture. 
  7. Stir in milk until just combined. Do not overmix. If you use some raspberries, don't fret if they squish a little. This batter is thick and will look like you've done something wrong. You haven't...just keep going.
  8. Generously spray bundt pan with canola cooking spray. Spoon mixture into bundt pan. You will need to spoon batter into each area. This batter doesn't spread so just keep spooning it into pan until all batter is in pan. Now use the back of your spoon and smooth out the top.
  9. Sprinkle superfine cane sugar on top of batter and place in oven for 60 to 75 minutes or until toothpick inserted near center comes out clean.
  10. Cool on wire rack for 15 minutes. Loosen cake from edge of pan with a thin flat spatula. Remove cake from pan. Cool completely if you can wait that long. If you can't wait, be careful biting into those hot berries. They burned my mouth but that didn't stop me!
Note: I made a little bit of lemon icing and drizzled it across the top while the cake was hot just for a little more lemony flavor. You don't need it but is another alternative should you choose. 

Bon Appetit!

Pico De Gallo Pork with Jubilee Rice

Do you love pork chops but would like to spice it up with something different? Well, I have a recipe for you to try out. Served with some fresh corn off the cob and you've got a winner of a meal.

Ingredients:
  • 4 top loin pork chops (no bone)
  • 1 tablespoon olive oil
  • 1 (15 oz) can black beans with liquid
  • 1 cup of Reser's Baja Cafe Pico De Gallo salsa (medium heat) or your favorite salsa
  • 1 tablespoon of freshly chopped cilantro
  • 1 teaspoon of garlic powder
  • 1 teaspoon of onion salt or to taste
  • 1 teaspoon of black pepper or to taste
  • 2 cups of Lundberg Jubilee Rice
Directions:
  1. Cut top loin pork chops into 1 inch chunks.
  2. Heat oil in a large skillet over medium-high heat. Add garlic powder, onion salt, and black pepper to skillet. Brown pork loin chunks until browned on all sides.
  3. Pour in beans with liquid and salsa. Bring to a boil and add cilantro. Reduce heat to medium-low, cover the skillet and simmer until cooked thoroughly, approximately 20 minutes.
Serve with jubilee rice or your preferred rice. I don't recommend white rice as it is too soft. Jubilee rice is a combination of sweet brown rice, short grain brown rice, long grain brown rice, whole grain Wehani rice, and whole grain black Japonica rice. It has a nice bite to it. It has zero sugars and 35g of carbs. I use my rice cooker to make it and added in an additional 3/4 cup of water because it needs more water than traditional white rice.

Serve with fresh corn and you have a match made in Heaven. Here's an easy way to make perfect corn on the cob. Take two ears of corn that haven't had the husks removed nor peaked at the top. Place in microwave and cook for 8 minutes. When done, remove (carefully-they are HOT) and place on a cutting board. Cut off the bottom end of the corn by cutting through all layers up about 3/4 an inch. You need to make sure to cut off enough or this won't work. After removing the bottom, grab a hold of the top of the corn husk and shake it and the corn will drop out of its clothing all perfect with silks left up inside. Sometimes you need to shake it a little harder and sometimes it falls right out. If it won't come out, you didn't cut off enough of the bottom. 

Serve pork mixture on top of rice. 

Bon Appetit!


Friday, June 10, 2016

Digitizing Letters - how small can you go?

Understanding the limitations of column width when it comes to digitizing is a lengthy learning process for a digitizer. To make it more difficult is when you do it for a living for customers not accustomed to things such as the width of a needle, different fabrics and how they react to a commercial embroidery machine, and the size and type of threads used.

More times than I can count, I've had customers request logos that could not be translated into embroidery at the size they requested and on the fabric desired.

In the case below, the first picture is the original logo. The width of the logo is a mere 3 inches by 1/2 inch tall.

The first problem is the small letters above measured in at .18 of a millimeter. In order to have enough room for the needle to make one column's width, you need a minimum of 1.0 millimeters. A needle measures in at .72 of a millimeter so you can see right away that a .18 is not going to be possible.

The second problem is the golfer that is sitting inside of the O. Remember what I said about the minimum size required. The distance left to right of the O was just at 1.0 millimeter so I can just barely get the O to spec and that's if there is no opening in the center of the O! I just stared at the poor golfer because I knew there was no way that I was going to be able to add him inside the O. It would be one big blob of thread.

The third problem but the easiest to fix was the word Classic. It at least was workable if I am able to make the logo bigger.
After modifying the customer's artwork, I made the necessary changes to the lettering so that it would stitch on a very thin moisture-wicking polo. I emailed it to my contact for approval. She gave me go and I started working on it. It was a slow process for such a small design. However, the end product stitched out quite nicely and looked very professional even at its small size. I tried to keep the customer's original artwork in mind with the design changes and added a modified golfer to the left of the artwork, allowing his left foot to be placed on the bottom part of the P and having the swing of the club nearly touch the top lettering. It appeared to be a win/win that the golfer was able to be kept even though he couldn't be inside of the O.

In order to get the upper lettering to remotely be stitchable, I had to again modify the artwork. The top lettering pushed the limits because it really ended up being just a tad shy of the 1.0 millimeter but I couldn't go any larger without making the entire logo larger than the customer wanted.
Ultimately the size ended up at 4 inches wide by .93 inches tall. This is as far as this logo went because the modified logo was rejected by the design department. They were not happy with having any changes made to their logo. I completely understand their feelings, but unfortunately there is only so much you can do if the specs of a design are out of whack with the chosen method to apply it.

I'm not sure what was ultimately done for the logo. Perhaps they decided to go with a screen print which doesn't have the same limitations of embroidery or whether they skipped branding the polos altogether. It was a learning experience for me as well because this is the first customer in nearly 12 years that approved changes but then rejected the finished design made with those changes.

Whenever possible if you can become involved with a customer prior to a design being finished, it will help tremendously because you will be able to help educate on what can and cannot be done depending on the size of a design.

Thursday, May 12, 2016

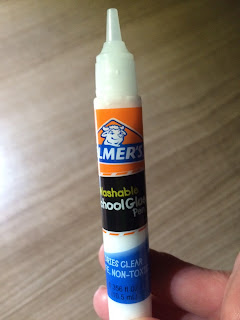
My Dollar Store Find


I spied these 'new-to-me' finds at my local Dollar Store and couldn't resist picking up a pack to try out. Elmer's School Glue (washable) is wonderful to use in lieu of the glue sold specifically for quilters and applique lovers. The problem with the normal bottle of glue is that you couldn't get just a smidgen of glue without purchasing an additional tip to add to your bottle of glue. Well, these little babies are small and have a tiny tip. From top to bottom, they are 4-1/4" tall and about the thickness of a yellow highlighter.

For a mere $1.00 and three in a pack, it's a deal that any quilter just can't pass up. Don't forget to check out your local dollar stores for quilter helpers. You never know what nifty things you will find.