This year I participated in an online ornament exchange. I received the name and address of my person as well as additional information she chose to provide and then I got to go to work on getting her ornament made and sent out. I elected to have a person outside the U.S. so had to run about as quickly as possible in order to assure she would receive it by Christmas.
Marina in Canada, if you are reading this, I hope you loved your ornament and goodies. I imagined your house all busy with Christmas celebrations and loved thinking of your black lab and rescue bird partaking in the celebrations as well. I really enjoyed stitching the bell and once it was done, I had to run back out and buy a bell for the inside so it would jingle!
The ornament I received traveled all the way from Williamsburg, Ohio! Shannon, I love the ornament you made me. Thank you so very much for it and for giving me a glimpse of your life, your family, and the starting up of your "farm." I don't have your email, but I hope to have a little something in the mail to you next week!
Here's a picture of how perfectly your ornament looks on our little tree. Shannon also sent me hot chocolate but it didn't last long enough for a photo and some fun stickers. Thank you again!
I took some action shots of how the 3-D Bell was made in case others with an embroidery machine wanted to give it a try. I hand sewed the individual sections together once the embroidery part was done. I also decided to use ribbons for the insert instead of a white organza that the instructions requested. I think it gave the ornaments a stained-glass effect. Depending on your ribbon, you can get lots of different looks. I made Marina's ornament with a red and silver ribbon and this next one is red and gold.
Because I run an embroidery business, I rarely embroider for fun. These bells were really a lot of fun and something I think I will do each year.
Red and gold ribbon
Cut into sections (each section had two pieces of ribbon sandwiched)
Ribbon fussy cut to fit my shape
Stitching down two sections of ribbon on washaway stablizer
Now I can let go of the ribbon and let the machine finish the rest of the stitching.
Showing posts with label Christmas. Show all posts
Friday, December 29, 2017
Monday, December 25, 2017
Merry Christmas from our home to yours!
I finished my nativity scene this morning! It was the perfect way for me to keep my mind on Jesus during the weeks leading to His birth.
Labels:
Christmas
Saturday, December 9, 2017
He's the Reason for the Season
It's been a while so this post is a tad bit long so grab yourself a cup of tea, and I'll wait right here for your return.
I'm so excited that I was able to finish the hand embroidery yesterday on my newest design. I'm calling it my forced handwork day because we lost power in the morning yesterday and it didn't come back on until later in the evening and even then it was off/on, off/on, off/on so much that it threw our furnace into a fault code and we lost heat until today at 11 a.m. Needless to say waking up at 4 a.m. to a 55 degree house was brrrrrrrrrrrrrrrrrrrrrrrrrrrrrrrrrrr.
Now that I've warmed up, it has been sandwiched and is ready to be pinned for some light machine quilting. I can't wait to hang it on the wall. Creating and stitching the nativity scene gave me quiet time to reflect on the birth of Christ and His sacrifice of leaving His throne in heaven to become flesh on earth. He did this for all of us everywhere and for every generation. I want to hold onto that kind of love every day of my life. I try to imagine the angels shouting praises at His birth and telling the shepherds out in the fields. Oh how my heart soars contemplating how the shepherds must have felt seeing and hearing an angel telling them about their Savior being born and then going to see Him lying in the manger.
My inspiration to design this scene was from a Facebook picture of a Santa Claus scene that had chalkboard fabric in the corner where you could write how many days it was before Christmas. I wanted to make something similar that reflected the reason for Christmas. Initially, I included a chalkboard area at the top, but it just didn't work design wise no matter how much I fiddled with the layout so I eliminated it and went with the Joy heart ornament instead. I also added the three wise men where the tree is but again it just didn't work. The size was off and it just felt wrong. Once I added the tree and changed the animals from side facing to front facing, it was perfect.
If you like hand embroidery using simple stitches (back stitch and stem stitch), you will love making this for yourself. Once I drew the design on the fabric, I painted in the areas and then went back and did the hand embroidery. You could just as easily add in some applique if you wanted to. I have not written up specific instructions, but if you are comfortable transferring designs to fabric and want to get a start on making your own nativity, post a comment below and make sure to leave your email address so I can email you the pattern. I am offering the design for free until the end of December at which time it will available to purchase with instructions.
Now onto gifts completed so far.
First one is a pillow. The design for the embroidery is one of Jenny of Elefantz. She is a wonderful prolific hand embroidery designer. If you don't know of her and her wonderful patterns, you are in for a treat. Head over there and be ready to be wowed.
Next is one of several ornaments that I've been making this month. I joined an ornament exchange this year and made this for my recipient that lives in Canada. I mailed it on December 1 with some other goodies that I'll share later. I sure hope it arrives safely and on time to her.
I plan to add another post on how I made it with the red insert you see so stay tuned. I had a childlike moment of wonder and discover while playing with it. Of course, I had to add a bell to it too. This particular one's insert is red and silver. I made another one with gold and red and it turned out beautifully too but I forgot to take a picture of it.
Next was a homemade food item --- Cream Cheese! How fun is that. I must admit that my first attempt failed but I'm pretty sure it was because my lemons had lost too much of their acidity. For the next batch, I used white vinegar. It worked perfectly! I'm adding the recipe link here because you know you want to make some too. An added benefit is that she has a video showing you how to do it. I love listening to her accent too!
Couldn't resist showing Mr. B being all pouty because I made him take a bath. This is right after him getting blow dried and he was none too happy with me.
I also attended such a fun get-together at a friend's house. Everyone brought such wonderful food and we each brought a wrapped ornament. We had a game where each person got a wrapped package and then each person got to roll a dice. I've included a picture below so you can see what had to be done based on how the dice rolled. It was such a blast. I had more fun watching others try to hold onto the ornaments they wanted only to see another person steal it away and then have it stolen from them. Once the last ornament was unwrapped, whatever ornament was on your lap was the one you went home with you. I had such a great time.
I have to ask if you've ever had a brain lapse? You don't have to really answer me, but I recently went blank on a subject that I shouldn't have and then later wonder what the heck happened to myself. Humor me because this particular post is for myself. During the get-together, we broke out on a conversation of broken bones. I know that sounds like a topic that wouldn't necessarily be spoken about at a Christmas get-together, but our hostess's hubby had just recently broken a bone in his leg. I couldn't stop thinking about the bones in my leg and how much that had to have hurt when I said I was glad I had not broken any of my bones. Well, I'm one crazy lady because I have broken bones; albeit none of the bigger arm or leg bones, but I've broken fingers (worst one was slamming my dad's old pickup door on my own hand), toes (many of them and some multiple times and one so bad that I won't even paint you a picture of it), and I broke my tail bone falling off a bicycle when I was young. So.....yeah, I think that means I've broken some bones. Now with that said, I may have broken something else that is escaping me but I figure I'd better write this down so I have it in print for myself later just in case I need to remind myself! LOL Oh, the joy of my brain getting older. Maybe it's time for some of that ginkgo pill. What's it called? {OH NO!}
Enjoy your weekend no matter where you are and don't forget to let me know if you would like the nativity scene pattern in the comment section. Please don't forget to let me know your email. The majority of posters have a no-reply which means I can't see your email and will not be able to email you the pattern.
I'm so excited that I was able to finish the hand embroidery yesterday on my newest design. I'm calling it my forced handwork day because we lost power in the morning yesterday and it didn't come back on until later in the evening and even then it was off/on, off/on, off/on so much that it threw our furnace into a fault code and we lost heat until today at 11 a.m. Needless to say waking up at 4 a.m. to a 55 degree house was brrrrrrrrrrrrrrrrrrrrrrrrrrrrrrrrrrr.
Now that I've warmed up, it has been sandwiched and is ready to be pinned for some light machine quilting. I can't wait to hang it on the wall. Creating and stitching the nativity scene gave me quiet time to reflect on the birth of Christ and His sacrifice of leaving His throne in heaven to become flesh on earth. He did this for all of us everywhere and for every generation. I want to hold onto that kind of love every day of my life. I try to imagine the angels shouting praises at His birth and telling the shepherds out in the fields. Oh how my heart soars contemplating how the shepherds must have felt seeing and hearing an angel telling them about their Savior being born and then going to see Him lying in the manger.
My inspiration to design this scene was from a Facebook picture of a Santa Claus scene that had chalkboard fabric in the corner where you could write how many days it was before Christmas. I wanted to make something similar that reflected the reason for Christmas. Initially, I included a chalkboard area at the top, but it just didn't work design wise no matter how much I fiddled with the layout so I eliminated it and went with the Joy heart ornament instead. I also added the three wise men where the tree is but again it just didn't work. The size was off and it just felt wrong. Once I added the tree and changed the animals from side facing to front facing, it was perfect.
If you like hand embroidery using simple stitches (back stitch and stem stitch), you will love making this for yourself. Once I drew the design on the fabric, I painted in the areas and then went back and did the hand embroidery. You could just as easily add in some applique if you wanted to. I have not written up specific instructions, but if you are comfortable transferring designs to fabric and want to get a start on making your own nativity, post a comment below and make sure to leave your email address so I can email you the pattern. I am offering the design for free until the end of December at which time it will available to purchase with instructions.
Now onto gifts completed so far.
First one is a pillow. The design for the embroidery is one of Jenny of Elefantz. She is a wonderful prolific hand embroidery designer. If you don't know of her and her wonderful patterns, you are in for a treat. Head over there and be ready to be wowed.
Next is one of several ornaments that I've been making this month. I joined an ornament exchange this year and made this for my recipient that lives in Canada. I mailed it on December 1 with some other goodies that I'll share later. I sure hope it arrives safely and on time to her.
I plan to add another post on how I made it with the red insert you see so stay tuned. I had a childlike moment of wonder and discover while playing with it. Of course, I had to add a bell to it too. This particular one's insert is red and silver. I made another one with gold and red and it turned out beautifully too but I forgot to take a picture of it.
Next was a homemade food item --- Cream Cheese! How fun is that. I must admit that my first attempt failed but I'm pretty sure it was because my lemons had lost too much of their acidity. For the next batch, I used white vinegar. It worked perfectly! I'm adding the recipe link here because you know you want to make some too. An added benefit is that she has a video showing you how to do it. I love listening to her accent too!
Couldn't resist showing Mr. B being all pouty because I made him take a bath. This is right after him getting blow dried and he was none too happy with me.
I also attended such a fun get-together at a friend's house. Everyone brought such wonderful food and we each brought a wrapped ornament. We had a game where each person got a wrapped package and then each person got to roll a dice. I've included a picture below so you can see what had to be done based on how the dice rolled. It was such a blast. I had more fun watching others try to hold onto the ornaments they wanted only to see another person steal it away and then have it stolen from them. Once the last ornament was unwrapped, whatever ornament was on your lap was the one you went home with you. I had such a great time.
I have to ask if you've ever had a brain lapse? You don't have to really answer me, but I recently went blank on a subject that I shouldn't have and then later wonder what the heck happened to myself. Humor me because this particular post is for myself. During the get-together, we broke out on a conversation of broken bones. I know that sounds like a topic that wouldn't necessarily be spoken about at a Christmas get-together, but our hostess's hubby had just recently broken a bone in his leg. I couldn't stop thinking about the bones in my leg and how much that had to have hurt when I said I was glad I had not broken any of my bones. Well, I'm one crazy lady because I have broken bones; albeit none of the bigger arm or leg bones, but I've broken fingers (worst one was slamming my dad's old pickup door on my own hand), toes (many of them and some multiple times and one so bad that I won't even paint you a picture of it), and I broke my tail bone falling off a bicycle when I was young. So.....yeah, I think that means I've broken some bones. Now with that said, I may have broken something else that is escaping me but I figure I'd better write this down so I have it in print for myself later just in case I need to remind myself! LOL Oh, the joy of my brain getting older. Maybe it's time for some of that ginkgo pill. What's it called? {OH NO!}
Enjoy your weekend no matter where you are and don't forget to let me know if you would like the nativity scene pattern in the comment section. Please don't forget to let me know your email. The majority of posters have a no-reply which means I can't see your email and will not be able to email you the pattern.
Labels:
Christmas
Friday, January 30, 2015
Secrets and how hard it is to keep them!
Oh, how I am dying to share my new English paper piecing mystery block of the month with all of you!!! Each time I finished designing a block, I proclaimed it to be my favorite only to have the next design become my new favorite.
Are you like that too? Whatever you are working on at that particular moment is your all-time favorite? Between embroidering hats for customers and this block of the month, it's taken up nearly all of my time, but I've been having a blast.
The first class is tomorrow and I'm ready to get this project into the hands of willing participants. I promise to take photos as the year progresses. It will be fun to see all of the color variations for each block. The class is at Pioneer Quilts. I hope to see you there tomorrow!
The pictures below are of one of my ongoing projects. The quilt is a rendition of Sue Garman's Ruffled Roses that she created in 2011 for The Quilt Show. I redesigned the center block, swag borders, and corner blocks to make it fit my Christmas theme. Sue is one of my top 10 quilt designers because of her attention to detail. Her instructions are meticulous, and she is someone I dream of meeting in person one day.
Each year I proclaim that this IS THE YEAR for me to finish it. LOL Someday...someday....
And here a a couple of actions shots!
Note to all meat eaters -- don't forget to check back in in a few days for Monday's Recipe. You won't be disappointed!
Labels:
Christmas,
EPPclass,
Ruffled Roses
Friday, January 9, 2015
Friday Finishes
My quilted tablecloth is finished, and it is my first 2015 finish. I'm so pleased with how it turned out. I must admit to be wonderfully surprised and thrilled at how soft became after washing. It was pretty stiff feeling before but the bamboo batting really softened after the soak to remove my markings and a run through the washer.
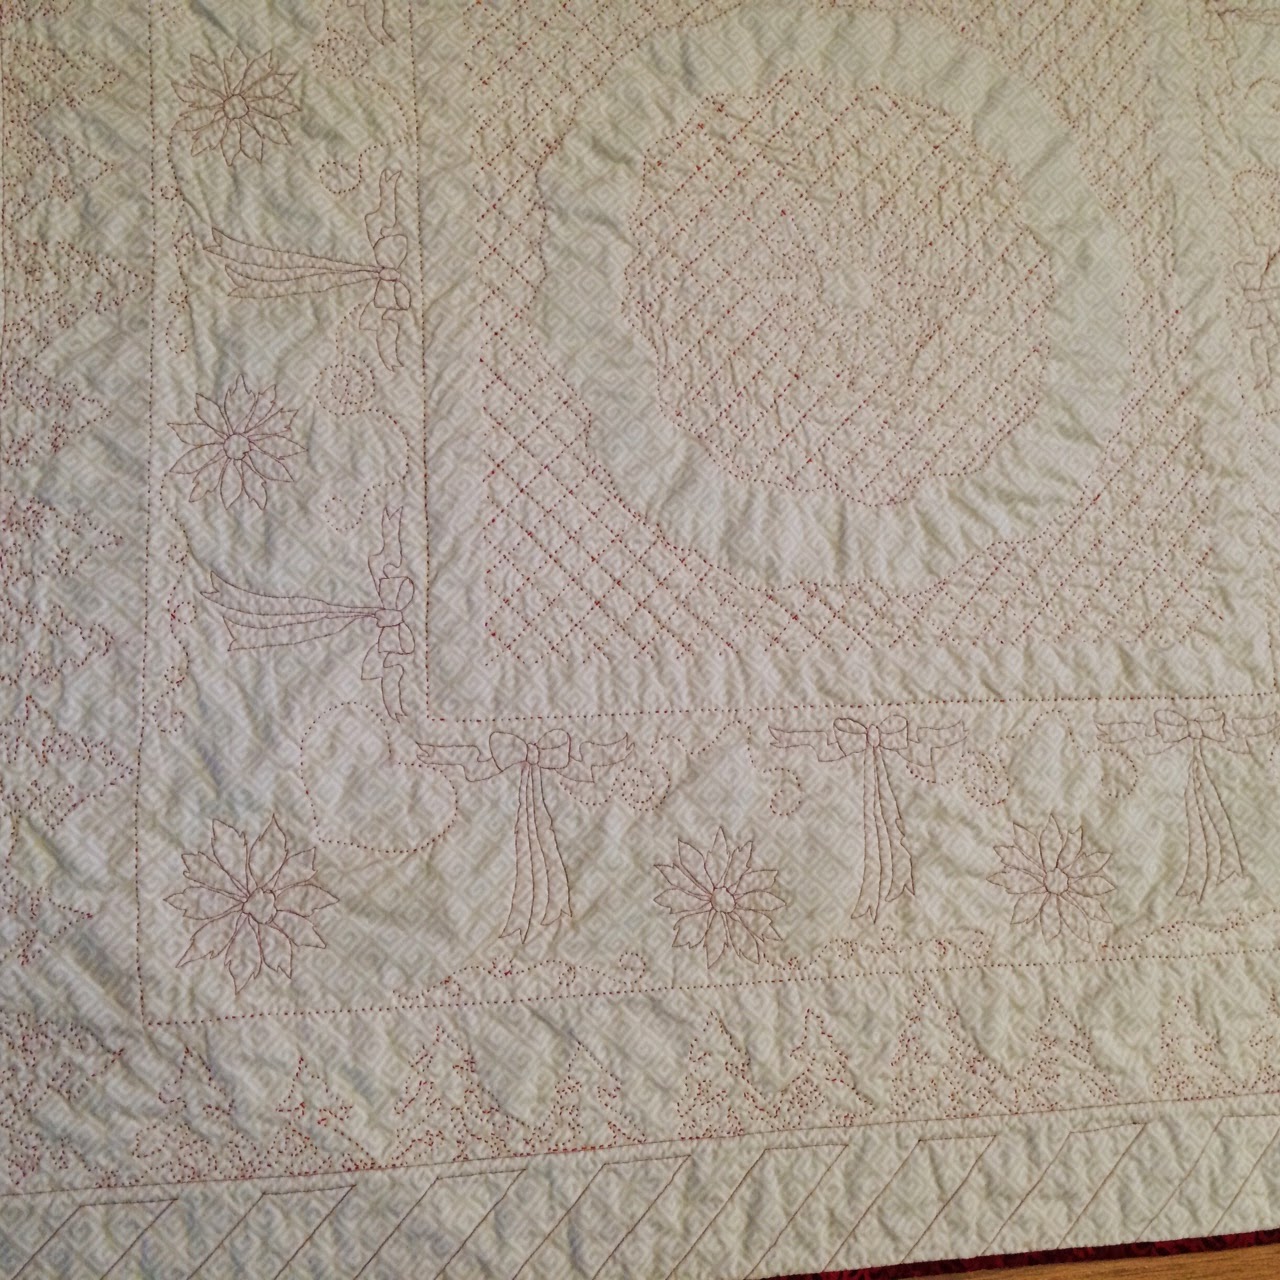
Vintage linen collectors or hand-quilting purists may not be pleased with my finished project and that's okay. We all must do what brings us the most joy. I hand quilted using the big stitch method with Aurifil 12 weight thread in areas that were visible. The thicker thread really stands out perfectly, which is what I was going after. I also practiced my free motion stitching and machine stitched in areas that are not visible from the front but needed more quilting to hold the quilt together and keep the batting from shifting/separating from repeated use. I'm planning on loving/using this tablecloth for many, many years. It will become a December tradition to pull it out and grace the table with it. I may just have to extend that length of use through out January because it looks so pretty on the table.
I hope that seeing this project from the beginning to the end has encouraged you to breathe new life into one of your own favorite linens or rescue one from a antique shop. They are not difficult to find.
Additional photos are included below. Click on the photo to see a larger version.
In this first photo, you can see the border area I mentioned when I first started (bottom left corner). The manufacturer stamped the cloth just a bit off which made the cream border not as wide on that one end. To fix this, I would have had to cut down the border all the way around. I decided against doing that because I wanted to keep as much of the cream border as possible. I'm so glad I did because I stitched funky trees in it, and I just love how it looks.
Vintage linen collectors or hand-quilting purists may not be pleased with my finished project and that's okay. We all must do what brings us the most joy. I hand quilted using the big stitch method with Aurifil 12 weight thread in areas that were visible. The thicker thread really stands out perfectly, which is what I was going after. I also practiced my free motion stitching and machine stitched in areas that are not visible from the front but needed more quilting to hold the quilt together and keep the batting from shifting/separating from repeated use. I'm planning on loving/using this tablecloth for many, many years. It will become a December tradition to pull it out and grace the table with it. I may just have to extend that length of use through out January because it looks so pretty on the table.
I hope that seeing this project from the beginning to the end has encouraged you to breathe new life into one of your own favorite linens or rescue one from a antique shop. They are not difficult to find.
Additional photos are included below. Click on the photo to see a larger version.
In this first photo, you can see the border area I mentioned when I first started (bottom left corner). The manufacturer stamped the cloth just a bit off which made the cream border not as wide on that one end. To fix this, I would have had to cut down the border all the way around. I decided against doing that because I wanted to keep as much of the cream border as possible. I'm so glad I did because I stitched funky trees in it, and I just love how it looks.
Labels:
2015,
Christmas,
Finishes,
Linens,
slow-stitching,
tablecloth
Sunday, December 14, 2014
Spirograph transformations & tablecloth pictures
In case you missed my last post, hubby gave me an early Christmas present -- a 50th anniversary Spirograph. It arrived on Friday but I couldn't play because I was working on customer logos.
I cracked open the box today which really isn't a box per se. Instead it is more like a briefcase which I really like. It has a flap that folds over and is secured with Velcro. Each section has a plastic covering that keeps each dial safely in its section.
You can start playing immediately because it comes complete with everything you need (paper, pens, dials, instructions, and even some play-dough type substance that is supposed to hold the outer dial to the paper). In the olden days (yes I'm that old), push pins worked just fine thank you. The sticky dough doesn't do a good enough job in my opinion and you will end up messing up your creation right as you near the end of it. It can make a grown child weep I'll tell you!
I was mesmerized as my eyes watched each creation come alive and at the same time my head exploded with thread possibilities. What if....and if I did this...and how cool would this look. I could hardly stand it and immediately had to see how the ink spiros would look in thread and how it would look in different stitches.
Here are 6 different versions of the same simple spiro shown in the above picture. Isn't it incredible how such a simple object transforms into something more when done in thread!
Here are a few more photos of my favorite one. It took a little extra time creating this one but I love the look and yes it is still the same simple shape except that it has an extra twist with long jump stitches.
And as of last night I am now onto the next border on the Christmas tablecloth. TADA.... isn't it looking great!
I hope I've encouraged you to to breathe new life into one of your cherished linens. If you don't have any linens yet, you can start hunting around locally or head to Ebay and even Itsy. Most are pretty inexpensive. Just read the descriptions well and really look at the pictures looking for stains. A few light stains are fine because your stitches will camouflage a lot of flaws.
I cracked open the box today which really isn't a box per se. Instead it is more like a briefcase which I really like. It has a flap that folds over and is secured with Velcro. Each section has a plastic covering that keeps each dial safely in its section.
You can start playing immediately because it comes complete with everything you need (paper, pens, dials, instructions, and even some play-dough type substance that is supposed to hold the outer dial to the paper). In the olden days (yes I'm that old), push pins worked just fine thank you. The sticky dough doesn't do a good enough job in my opinion and you will end up messing up your creation right as you near the end of it. It can make a grown child weep I'll tell you!
I was mesmerized as my eyes watched each creation come alive and at the same time my head exploded with thread possibilities. What if....and if I did this...and how cool would this look. I could hardly stand it and immediately had to see how the ink spiros would look in thread and how it would look in different stitches.
Here are 6 different versions of the same simple spiro shown in the above picture. Isn't it incredible how such a simple object transforms into something more when done in thread!
Here are a few more photos of my favorite one. It took a little extra time creating this one but I love the look and yes it is still the same simple shape except that it has an extra twist with long jump stitches.
And as of last night I am now onto the next border on the Christmas tablecloth. TADA.... isn't it looking great!
I hope I've encouraged you to to breathe new life into one of your cherished linens. If you don't have any linens yet, you can start hunting around locally or head to Ebay and even Itsy. Most are pretty inexpensive. Just read the descriptions well and really look at the pictures looking for stains. A few light stains are fine because your stitches will camouflage a lot of flaws.
Labels:
Christmas,
Embroidery,
Linens,
Spirograph,
tablecloth
Monday, December 8, 2014
Lap Quilting & Manic Monday
If days of the week had energy levels, I think Mondays would win hands down. Mondays always seem to bring out the most busy, hectic, frenziness of me and my customers. Everything is always a rush on Mondays!
I made very good progress on the outer most center section this weekend. Here's a view from my lap of how it's coming along. The diagonal quilting stitches looked really nice but adding the other diagonal side takes it from nice to perfect.
On Saturday, I spent the day at Pioneer Quilts where it was Meet the Teachers' Day. They moved into a historic house called the Broetje House in Milwaukie, Oregon, a few months back and are in the process of a lengthy renovation to bring the electricity up to code so that classes can be taught. The house was built by John F. and John H Broetje in 1890, and it really is a special place. I can't wait until summer so that I can tour the gardens, which is complete with a water tower, two garden gazebos and 100 year old Sequoia Redwoods. Linda has already done an amazing job in a short time.
I brought all of my hexagon projects so that prospective students could see and touch the items that I will be teaching at the shop. I positioned myself in the breezeway so I was able to greet each guest as they arrived. The lighting was perfect and allowed for me to quilt the tablecloth while people were coming and going. Little did I know how much interest I would generate by working on the tablecloth. I am pretty sure I made a few linen converts and more than a couple vintage tablecloths will be put back into use soon. For those who think handwork is not their cup of tea, I recommend starting with something small and playing around with big stitches. You may just surprise yourself with how much you enjoy the process!
My purchase of the day was Sue Spargo's book Creative Stitching.
I've been eyeing this book ever since Sue finished it. I decided a while back though that I would not buy a book that I could not review prior to the purchase. I've never found it locally to look at until this weekend. It is a great size at 7-1/2 inches tall by 6 inches wide and is spiral bound which I really appreciate. The entire book represents 50 of Sue's favorite hand stitches that can easily transform a pretty top into a exquisite top. It includes great pictures and step by step instructions. It will be a book that will get used and loved for years.
How is your Manic Monday coming along? I'd better get back to the two new customer logos that need out the door!
Labels:
Christmas,
slow-stitching,
tablecloth
Friday, December 5, 2014
Slow stitching and the mystery of the disappearing needle
I finished big stitching the center of the tablecloth last night, and I must admit to being really pleased with the look and feel of it. The big stitches in red thread have such a nice look to it. The center area is a snowflake which was stitched first and then followed up with the grid stitching. I did have to pick out a few stitched lines of the grid and redo them to ease in a bit of excess fabric but it was worth the extra effort. It lays nice and flat and really calls out to be touched.
To aid my marking, I tried a new-to-me stencil from a company called fulllinestencil and I must admit to being quite stricken in a good way to it. It's similar to screen print where what you want to be inked is open and the rest of it is blacked out. You use a chalk called Quilt Pounce to slide across the stencil to mark your stencil. Don't do an up and down pouncing movement or you will end up with a face full of chalk dust and no nice line on your cloth. Just rub smoothly across the stencil and it works perfectly.
Unfortunately, my tablecloth material did not like holding on to the chalk so any touching of the fabric rubbed the chalk right off and left me with nothing to follow. Disappointed but not daunted, I pulled out my go-to marking product -- Crayola Fine Line Ultra-Clean Washable Markers. I used the orange marker and marked right on top of the chalk line. It didn't take too long and the nice thing is that I was able to mark a very fine line on top of the chalk...finer than I would have marked had I just started off with the marker from the beginning. I'll report on the stencils again once I have more experience using them on 100 percent cotton fabric.
Slow stitching is so therapeutic. I'm pretty sure my heart rate goes down and my breathing slows as I take each stitch into the cloth. My goal was to finish the center so I could share my progress with you, but I did take a wrong turn that stopped everything for about an hour.
I'll paint a picture of what happened. Here I am happily stitching away in my Lazy Boy chair. Dillan, my baby dog, is situated in between my legs and underneath the tablecloth (it's terrible keeping him off of anything that resembles a quilt because obviously everyone knows that ALL quilts belong to HIM). I had just run out of thread and threaded my needle, which by the way is not a small needle (#20 Tulip Chenille needle). My knot was popped inside of the batting when I did something I should not have and reached for an object. At exactly that same moment my needle magically disappeared into thin air. Now I know what you must be thinking because I have already thought it. The needle must have slipped off and fallen on your lap, chair, tablecloth, floor...yada, yada, yada.
When a needle is dropped, everything stops until said needle is found and safely back where it needs to be. Dillan was grudgingly and under very loud protest put into his crate. All lights were turned on and with flashlight in hand, I searched and searched and searched for the missing needle. For the first time ever I could not find the needle. I am thinking to myself -- how could such a big needle hide from me. I ran my hand down each side of the chair hoping to actually poke myself and locate it. The floor was scoured back and forth with flashlight hoping to catch a glimmer of the shiny needle. The tablecloth was searched repeatedly and even squeezed multiple times because needles do not just disappear in thin air.
Finally and as a last resort I pulled out the vacuum cleaner. Surely, I would be able to find it now, but to no avail. By the time I was done vacuuming, my eyes were blurry and sleep was calling. As I fell to sleep I just knew that the morning light would bring closure to the hidden needle.
However, this morning the needle remains a mystery. I even removed the back off my chair thinking it had to...just had to have been wedged there somewhere, but to my disappointment, no needle was found.
Has this ever happened to you? I'm considering all possibilities now! Could it be that my arm movement last night broke through the space-time continuum! Who knows where it landed but let's hope a quilter finds it and puts it to good use.
Labels:
Christmas,
slow-stitching,
tablecloth
Wednesday, December 3, 2014
Quilted Christmas
Does anyone else do what I do when I look at old linens? There is something about them that makes me want to touch and ooh over them. My mom would always pull out her best tablecloth for the Holidays and maybe that tradition made me appreciate them even more. Do you have any family linens that have been stored away for that perfect setting? Or maybe you are like I once was and believed that they should be admired from afar and never used.
How did I ever get into that silly tradition? Years ago, I would pull out my best dinnerware to use for the holiday and then put them away not to be seen or loved on for months on end. About 10 years ago, I stopped that nonsense, and I am not sure why I did, but it may have been a discussion that my husband and I had about the subject. Since that time we use our best dinnerware everyday! Each meal is special now and not just the few times a year that I made up in my mind.
If old linens could talk, can you only imagine the stories they could tell us. I would like to hear them for sure. I have several old linens that have been given to me and I have a goal of pulling them out and using them or using them to make something new. Is that sacrilege? I don't think so. In fact, I think that the original owners would be happy to know that they are still giving happiness to us.
Check out this tablecloth from the 50's! I thought it was kind of special because it is on the small side at 50 by 51 inches, but then tables from the 50's weren't huge. I remember my parents had a red melamine table that had chrome legs! We were styling. I'm pretty sure the red seats were a red vinyl. I remember in the summertime, my legs would stick to the seat. Yep...that must have been a vinyl plastic material.
It has a few light stains on it, but nothing too noticeable. Our kitchen table is a small 36 x 36 inches so I thought this would look pretty dandy on it. Then I decided that I could add to the charm of the tablecloth by adding a border to it and a backing with batting and make it sing even louder.
Here's the next step.
Pretty sweet looking, huh! Don't you think the red border really made it pop. Now the thing is with these pre-stamped tablecloths from this age is that the ink may or may not have been stamped square. This one missed the mark on the outside border so there is less cream on certain edges then on the opposing corner. I could have trued it up, but then I would have lost a lot of the cream which I wanted to keep. I figured that if it didn't bother the original owner I wouldn't let it bother me either.
I did try to square the inside red border as much as possible and then basted it to the batting and backing and am now in the process of hand quilting it using the big stitch method. I'm using red Aurifil thread in size 12 and it is adding a lot of definition. The batting is a new-to-me bamboo batting. It was nice and flat which should lend itself well for a tablecloth.
More pictures to be posted soon. What are you working on this week?
Subscribe to:
Posts (Atom)