If you have been following me this year, you know that 1) my husband and I lived through a lengthy home remodel, which made it difficult to blog, live, eat, and definitely sleep! and 2) I designed a quilt using three shapes (diamond, triangle & hexagon) and have been teaching it as a mystery block of the month class locally.
Please allow me to introduce you to Arabella. The picture above is the culmination of the last nine months of classes, and on Saturday, I unveiled her all sewn together with her layout and passed out October's pattern. It was a wonderful class as nearly every student was able to attend. If any non-quilters would have been walking outside our building, I'm sure they would have been wondering what in the world was going on in there as the volume of our voices got louder and louder as we got caught up, had show n-tell and then worked on blocks and talked about how each person was planning on finishing.
English paper piecing (EPP) may seem intimidating especially when some quilts are completely put together with it and may be 7 to 10,000 pieces or more. My goal was to design a quilt that was doable for anyone, enjoyable even for the most of advanced students, and just challenging enough to keep interest but not so much to have a student give up. I feel like I met my goal. The triangle was the most difficult shape in this quilt because of its small size, but the quilt top would not be nearly as beautiful as it is without that shape.
There is one more row to be added to the bottom (October, November, and December) and then the last borders will be added. It's been a fantastic ride for me, and I cannot wait to offer the pattern to everyone in 2016.
There will be videos available to help you as well as many up-close pictures of me progressing through the blocks. Don't let not having done paper piecing stop you from having your own version of Arabella. I hope you will consider adding Arabella to your must have patterns for 2016.
What do you think? Are you ready for an 2016 adventure in paper piecing? This project really is a fun and addicting way to get started with EPP without committing to a project that takes thousands of shapes and years to finish.
Showing posts with label EPPclass. Show all posts
Sunday, November 1, 2015
Monday, October 12, 2015
Are you reluctant to purchase a fabric cutter?
I've been an owner of an AccuQuilt fabric cutter for about five years. I started off with the Go cutter which I still own and love. Last year, I purchased the electric version called Go Big and I have not looked back since. In fact, I'm considering selling my Go cutter now because it sits quietly and is not being used like it should.
My reasons for purchasing a fabric cutter are many, but my primary reasons were more accuracy and faster cutting. I put off purchasing one for many years because I heard and believed all of the stories about fabric waste. I dislike waste as much as anyone and stalled each year until there was a sale that I couldn't pass up on and took a chance. When I purchased it, there were very few help videos available and no one locally taught anything about them and the best practices for use. I have since found what works best for me and I have very little waste.
As far as the cost of the dies, yes, they can be expensive but so is your time and if you are finding that your cuts are just a little 'off,' and have been struggling with blocks being too big or too small, you will gain back your sanity and enjoy creating again. I look for sales and am selective about which dies I buy. Strip dies are worth the cost to me because I can get the most bang for my buck so to speak. However, if you find that you use a lot of a specific thing (i.e., hexies, half square triangles, 2 inch squares), you may benefit from purchasing a specific die for that purpose. I use A LOT of hexies and purchased a die that has three different sizes on it. I used that die for over 10,000 cuts before I killed the smallest size and had to purchase another one. And the die still works well on the middle and large hexie. That is the only die that I have had to replace in all these years.
If you are like me and have issues with your hands, you would love having the electric version of the cutter. Even my husband notices that I am able to sew more now that I have the Go Big electric. Actually, he was the reason I purchased the Go Big because he encouraged me to preorder it before it was even available. On some of the strip dies, I would ask for his help in turning the handle because my hands and wrist just don't have the mobility that they once had. The electric version pulls the die through all by itself so it really does do all of the work. And if you pre-measure the width of the die and cut your fabric accordingly and fan fold, you can see from the picture above that there is very little waste. I don't even cut the fabric with a rotary cutter now. I just use a blue wash away pen and mark every so often and cut with my big scissors. I also steam the fabric once it has been fan folded and the cuts come out perfect every time.
So if you've been on the fence, please find someone who has a cutter and has used it so you can get familiar and find out if it would be a good addition to your tool chest. If you are able to find a class, you will learn even more. I teach locally and have had many students who owned them but never used it or used it but wasn't comfortable. It is really helpful to learn tips and tricks for best practices.
I hope this post helps someone who may be on the fence like I was on whether a cutter is something you will use and love. Okay, it's time to get back to sewing borders on the BOM blocks that I'm teaching.
My reasons for purchasing a fabric cutter are many, but my primary reasons were more accuracy and faster cutting. I put off purchasing one for many years because I heard and believed all of the stories about fabric waste. I dislike waste as much as anyone and stalled each year until there was a sale that I couldn't pass up on and took a chance. When I purchased it, there were very few help videos available and no one locally taught anything about them and the best practices for use. I have since found what works best for me and I have very little waste.
As far as the cost of the dies, yes, they can be expensive but so is your time and if you are finding that your cuts are just a little 'off,' and have been struggling with blocks being too big or too small, you will gain back your sanity and enjoy creating again. I look for sales and am selective about which dies I buy. Strip dies are worth the cost to me because I can get the most bang for my buck so to speak. However, if you find that you use a lot of a specific thing (i.e., hexies, half square triangles, 2 inch squares), you may benefit from purchasing a specific die for that purpose. I use A LOT of hexies and purchased a die that has three different sizes on it. I used that die for over 10,000 cuts before I killed the smallest size and had to purchase another one. And the die still works well on the middle and large hexie. That is the only die that I have had to replace in all these years.
If you are like me and have issues with your hands, you would love having the electric version of the cutter. Even my husband notices that I am able to sew more now that I have the Go Big electric. Actually, he was the reason I purchased the Go Big because he encouraged me to preorder it before it was even available. On some of the strip dies, I would ask for his help in turning the handle because my hands and wrist just don't have the mobility that they once had. The electric version pulls the die through all by itself so it really does do all of the work. And if you pre-measure the width of the die and cut your fabric accordingly and fan fold, you can see from the picture above that there is very little waste. I don't even cut the fabric with a rotary cutter now. I just use a blue wash away pen and mark every so often and cut with my big scissors. I also steam the fabric once it has been fan folded and the cuts come out perfect every time.
So if you've been on the fence, please find someone who has a cutter and has used it so you can get familiar and find out if it would be a good addition to your tool chest. If you are able to find a class, you will learn even more. I teach locally and have had many students who owned them but never used it or used it but wasn't comfortable. It is really helpful to learn tips and tricks for best practices.
I hope this post helps someone who may be on the fence like I was on whether a cutter is something you will use and love. Okay, it's time to get back to sewing borders on the BOM blocks that I'm teaching.
Tuesday, September 1, 2015
It's a Party -- A Hexie Party
If you missed out on the classes, you have a couple of options. I will repeat the class next year for those who are local and want to attend class and join in with others. It's amazing how much creativity is spurred in a classroom environment each month. I think it really helps to get ideas and see others creations in progress.
For those who are not local or cannot attend the classes, I will have the pattern for all 12 blocks available for purchase at the end of this year once all of this year's classes have completed. And, whether you attend actual classes or buy online, online videos will be available to help you get off to a great start. It's like having me by your side whenever you need me.
Stay tuned for more information!
Here's our party in progress! I added a video at the end for those who haven't thread basted before and want to see how I do it.
| Another photo album by Smilebox |
Wednesday, July 1, 2015
Our BOM Fun Continues
Life is getting nearly back to normal. We are heading down the home stretch with the remodel and it is definitely a GREAT THING! The refrigerator is in the kitchen as of yesterday. Can I hear a BIG WooHoo.... Now, if I would just stop going in the living room looking for the fridge!
Last Saturday was my block of the month class and honestly that one day a month has really helped me get through the remodel by making me take time to focus on next month's block that will be unveiled.
Of course, I have to share some bragging pictures of my student's blocks. I love all of them!
The complete pattern for all of the blocks will be available for purchase after this mystery block of the month has ended so stay tuned for more information later in the year.
I hope to also do a repeat of the class next year; although, it will not be a mystery because the completed quilt will be finished for everyone to see before signing up for the classes.
Last Saturday was my block of the month class and honestly that one day a month has really helped me get through the remodel by making me take time to focus on next month's block that will be unveiled.
Of course, I have to share some bragging pictures of my student's blocks. I love all of them!
| Another free picture slideshow by Smilebox |
The complete pattern for all of the blocks will be available for purchase after this mystery block of the month has ended so stay tuned for more information later in the year.
I hope to also do a repeat of the class next year; although, it will not be a mystery because the completed quilt will be finished for everyone to see before signing up for the classes.
Saturday, April 25, 2015
Bees in the Hive!
I love the last Saturday of each month because my students bring in last month's block for show and tell. My students are kicking my butt on their creations, and I'm so loving it!!! Check out these wonderfully, creative hives!
Last month's block was the beehive and let me tell you we had lots of buzzing going on. Any bee would be ecstatic to have one of these as their home.
The class ended much too quickly as it always does but everyone got started on the April block which is a spring basket and the May block was shown. This year is truly flying by!
I'm in the midst of a home remodel so posting is going to be hit and miss for a while until I can dig out periodically from all the dust and debris!
Last month's block was the beehive and let me tell you we had lots of buzzing going on. Any bee would be ecstatic to have one of these as their home.
| Personalize a free slideshow design |
The class ended much too quickly as it always does but everyone got started on the April block which is a spring basket and the May block was shown. This year is truly flying by!
I'm in the midst of a home remodel so posting is going to be hit and miss for a while until I can dig out periodically from all the dust and debris!
Labels:
EPPclass
Friday, April 3, 2015
I'm too Hexie for my love---too hexie for my love...
I'm too hexie for my stash....
too hexie for my stash...so hexie that it hurts...
I'm your model you know what I mean...
When I do my little joinings on my hexie things!
On my hexie things...you know what I mean.
I can go on and on...
making hexie things.
Making hexies...yay...my hexie things.
Come on now...you know you were humming it along with me! :) A songwriter I will never be, but everyone know that I am 'head over hexie' for hexies. Don't believe me? Just ask any of my students.
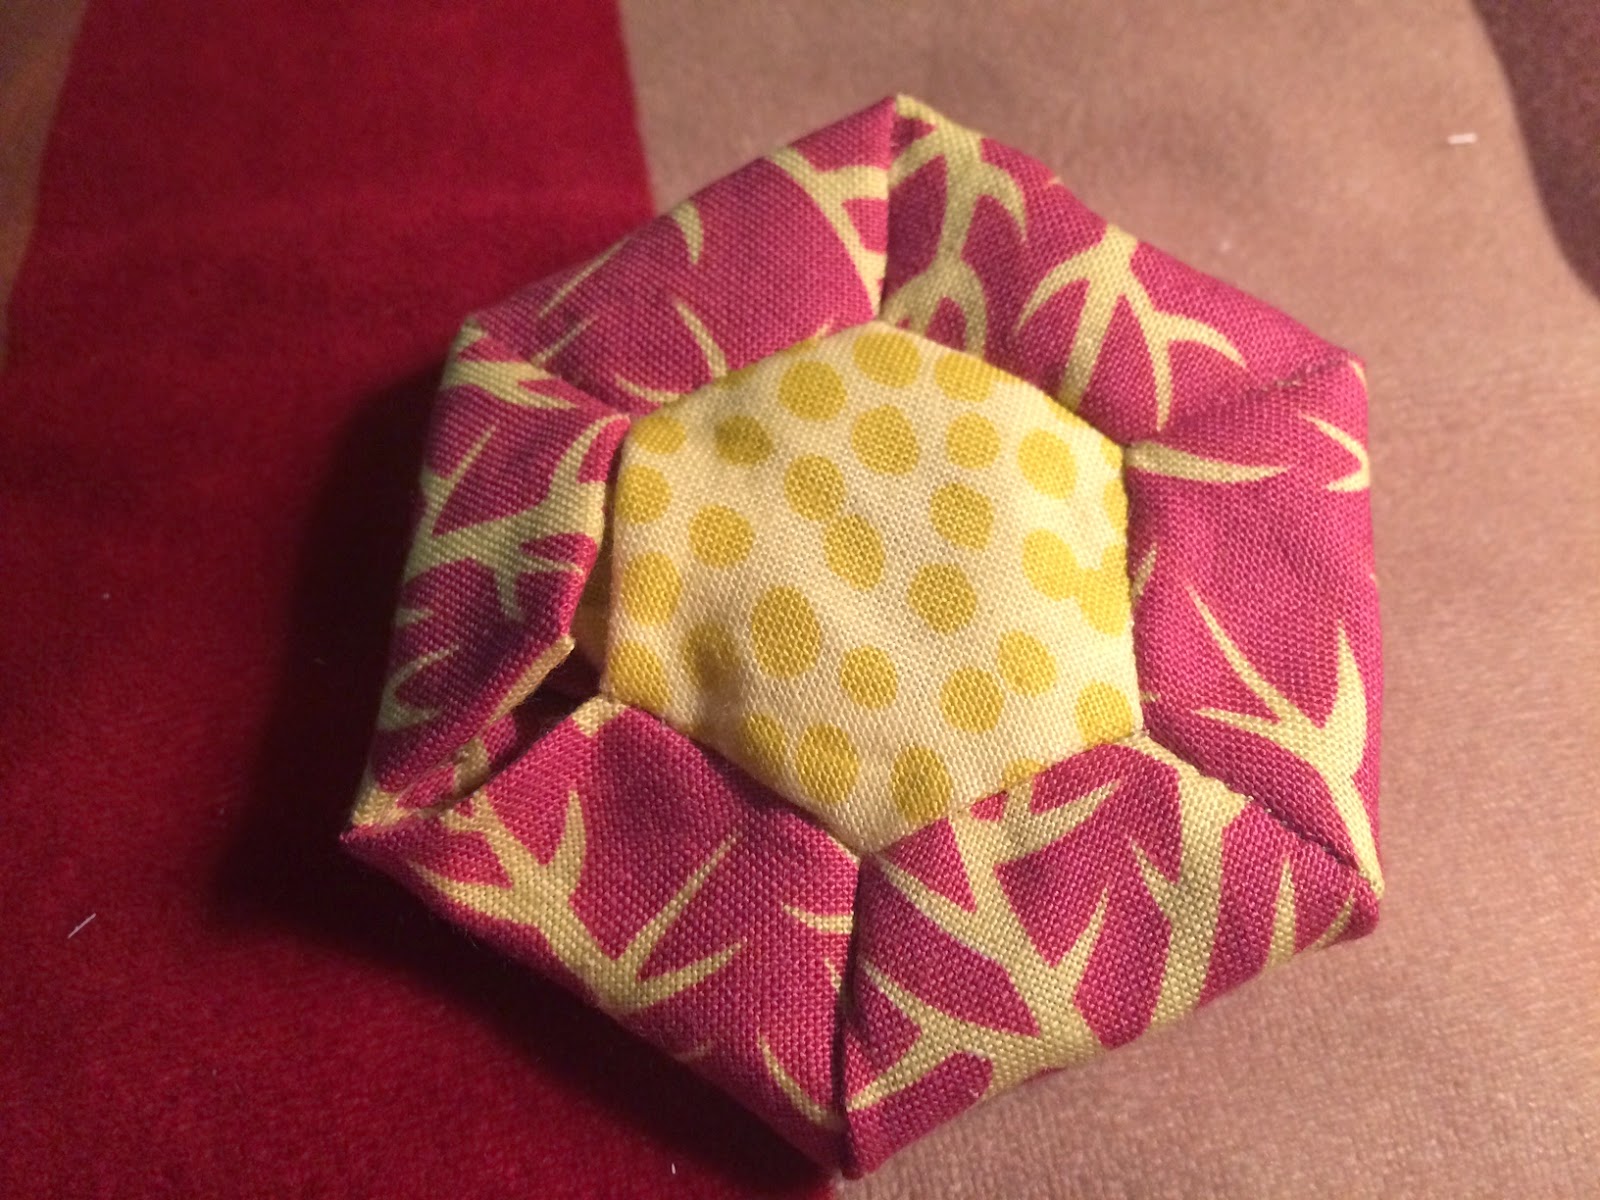
And speaking of my students, last Saturday during the Intro to Hexie class one of my students (thank you Jenny Tuomi!) showed me how to make her awesome pincushion. During the class, she drew a hexagon and asked which direction to stitch and then she numbered each one as I went around the hexie. I used her method of writing the numbers on the paper to figure out how to sew it. I couldn't help but make one for myself after hearing her explanation. I love learning new things from my students!!!
Wanna make one for yourself? Yeah, I thought so. And when you finish it, you too can sing the "I'm too hexie for my love" song.
I should have been making a sleeve to go on a quilt that I am to drop off on Monday. I cannot make myself start the stupid sleeve! Anyone want to make some extra money and make and sew it on for me!
Here is the drawing I made based on Jenny's instructions. I color coded the numbers to help making following it easier. I used 3/4 inch hexie papers and it is a little pincushion that's a perfect travel size.
It is a little fiddly to sew when you get down to the last few corners. Just remember to work on the seam right in front of you and ignore the others sticking out. I couldn't remember when Jenny took the papers out, but I found it too hard to leave them in until the very end so I removed the paper as soon as I had sewn around all sides. For example, I took out the middle (back) hexie as soon as the 6 hexies were sewn on.
Here's the center flower done with Nos. 1 and 2 sewn,
You can see it gets a little odd looking as you keep going.
This photo shows the papers being removed as I progressed. This made it much easier to continue. Note: see that white ball of fluff in the background. My boy, Dillan, is always ready to lend his thoughts on my projects.
Here I am on the last two sides. I left it open so I could turn the hexie. I also removed all the papers before turning it. When you remove all the papers, the edges do 'not' want to stay shut. I used Roxanne's glue baste to glue baste them back in the position I wanted. It works perfectly!
Here it is all turned and finger pressed into position. Isn't it cute?
I opened up the two sides so you could see a little better. Because I seriously dislike feather light pincushions, I stuffed it with crushed walnut shells with added sand and lavender buds.
I love it! Added a ribbon flower to the front and a small button to the back and pulled the thread tightly to make a little indent.
Saturday, March 28, 2015
Woop...Woop - It's EPP BOM Class Day!!!
Check out the rhododendrons in bloom in my neighborhood!!! Who doesn't love the color RED.
I LOVE the last Saturday of each month because I get to unveil the new block of the month, see all of my awesome students, and ooh and awe over the wonderful blocks from the previous months.
This month is our third month of classes. I love seeing all of the fabrics chosen for the blocks. I fall in love with each and every one of them. It's funny because I love my students fabric selections better than my own! Now that's doing one better than the teacher I think.
I am so mad at myself because I was having such a great time that I almost didn't get any pictures. There were some that I completely missed...dang it! But hopefully, I will catch up and do better next month.
Without further ado, see for yourself how beautiful they are...
| Create your own free photo slideshow |
Friday, March 20, 2015
Camera, Action, Shoot!
Famous for a day! LOL. Sorry for the blurry picture. The board is digital and backlit and my phone couldn't seem to focus correctly. I sure had a fabulous day sharing my love of hexagons with some 60 ladies that were kind enough to interrupt their enjoyment of looking at all of the wonderful quilts on display at the Milwaukie Quilt Show. The show continues through tomorrow and really shouldn't be missed. I hope you will check it out for yourself.
And I had to pinch myself because I came face to face with Bill Volckening. I've followed his blog for years but this was the first time we've met in person. He was as nice in person as he is in print!
This beautiful hexie top below belongs to Wendy Sternberg, one of my BOM students, who graciously allowed me to display it during the demonstration. The 3/8 inch hexies are like droplets of rain...each more wonderful than the next. If I remember correctly, she has been working on it for two years. It is about 45 inches wide so far. Isn't it beautiful.
Great news!!! We will soon be welcoming new hexie aficionados because several ladies attending the demo decided to join the Hexie Block of The Month class and the Hexie 101 class that I teach at Pioneer Quilts. Woohoo. This is a cause for celebration!
And speaking of block of the month, I'll be cutting fabric tomorrow for the May block. Next Saturday, March 28, everyone will get the March block and get to see April's block so they can start picking out fabrics. I need to stay a month ahead and am hoping to get a few months ahead.
And lastly, here I am with my Dilly dog. I love this picture of him. If that isn't a big smile, I don't know what is!
Tuesday, March 3, 2015
For the Love of my Students!
Both of my Saturday's classes were fantastic and I just have to brag on my students!
The first one was the yearlong Mystery Block of the Month EPP class. I am so proud of each student and their January accomplishments. The three shapes we are working on this year are hexagon, diamond,and triangle. January's block introduced the diamond and hexagon. Each snowflake is perfection at its best and I can hardly wait to see everyone's February's blocks at the end of this month.
The next class on Saturday was the Star Hexie class. And let me tell you, the students were stars and came ready to work. We did all of the fabric cutting of the hexagon and triangle shapes using the AccuQuilt go and GoBig cutters and then machine sewed them together.
The students all completed one diamond section and then they have a week of homework before coming back to class on March 14 to finish up.
I love teaching!
The first one was the yearlong Mystery Block of the Month EPP class. I am so proud of each student and their January accomplishments. The three shapes we are working on this year are hexagon, diamond,and triangle. January's block introduced the diamond and hexagon. Each snowflake is perfection at its best and I can hardly wait to see everyone's February's blocks at the end of this month.
| Make your own free photo slideshow |
The next class on Saturday was the Star Hexie class. And let me tell you, the students were stars and came ready to work. We did all of the fabric cutting of the hexagon and triangle shapes using the AccuQuilt go and GoBig cutters and then machine sewed them together.
The students all completed one diamond section and then they have a week of homework before coming back to class on March 14 to finish up.
| Make a free slideshow design |
I love teaching!
Labels:
AccuQuilt,
EPPclass,
StarHexclass
Friday, February 27, 2015
Bzzzzzzzzzzzzz - Giveaway
Happy Friday! We are having a seriously early spring in Oregon. No matter where you go, blooms are everywhere. All of the trees have awoken and it is beautiful. I'm keeping my fingers crossed that old man winter continues to stay away so that the plants and trees are not damaged from their early awaking. It is hard to believe from looking outside that March 1 is only two days away. It feels and looks more like late April/early May.
The birds are screaming this morning. I put out a new suet feeder yesterday and the party has begun! They are so fun to watch. On Monday, I couldn't help myself and worked in the flower garden and the bees have arrived! I guess the scents of the flowers have them searching out fresh food. I've been busy as a bee as well making free-form bees for my students taking my EPP Mystery Block of the Month. You never know when the teacher will be gifting goodies that can be added to a future block. :)
Okay, today's the day to leave a comment if you would like to win Edyta Sitar's Friendship Strips & Scraps book. In the comment section, please let me know what you have taught to another person whether it be online via a blog or in person. Please make sure I have a way to get a hold of you should you win. Only one person wrote a few weeks back about the giveaway. I'm hoping that there are others interested as well, but perhaps everyone has already purchased this particular book. It is an awesome one for sure. I will draw a winner tomorrow morning before I leave to teach.
Good luck!
The birds are screaming this morning. I put out a new suet feeder yesterday and the party has begun! They are so fun to watch. On Monday, I couldn't help myself and worked in the flower garden and the bees have arrived! I guess the scents of the flowers have them searching out fresh food. I've been busy as a bee as well making free-form bees for my students taking my EPP Mystery Block of the Month. You never know when the teacher will be gifting goodies that can be added to a future block. :)
Okay, today's the day to leave a comment if you would like to win Edyta Sitar's Friendship Strips & Scraps book. In the comment section, please let me know what you have taught to another person whether it be online via a blog or in person. Please make sure I have a way to get a hold of you should you win. Only one person wrote a few weeks back about the giveaway. I'm hoping that there are others interested as well, but perhaps everyone has already purchased this particular book. It is an awesome one for sure. I will draw a winner tomorrow morning before I leave to teach.
Good luck!
Labels:
EPPclass,
Passing it On Challenge
Tuesday, February 24, 2015
Mystery EPP Block of the Month & GIVEAWAY
Don't forget to come back and leave a comment on Friday's post. Let me know what you've taught to another person either online or in person for a chance to win! The prize is an unused, new book by Edyta Sitar called Friendship Strips & Scraps. I'll ship anywhere in the world so all can enter!
This Saturday is the second of a yearlong series of classes of my EPP Mystery class. I have had such a fantastic time designing the blocks for this quilt. I'm now working on the layout and borders.
I can hardly wait until Saturday to to see all of the color variations of January's block. Once everyone gets January's and February's blocks done, the comfort level of working with the three shapes will be easier and easier. My mantra for the year is FUN, FEARLESS, and FANTASTIC. We are working with the following shapes: hexagon, triangle, and diamond. The blocks are created and then appliqued on either a light or dark background fabric. Some students in the class are planning on using both light and dark backgrounds in the quilt. How fun is that! I'm sticking with the light background on mine but will utilize the dark background fabric in the borders.
Stay tuned....I'll post pictures after the class.
It is so Spring-like here in Oregon and everything is in grow mode and blooming. Today, we may reach 65 degrees! If we have the cold spell they are expecting mid March, it could be devastating. I heard that the local growers are already separating plants in an attempt to avoid massive losses. Not sure what I can do here at home, but I was gifted some large recyclable bags from my local pet store today so I have enough to at least cover my blueberry plants if needed.
I can hardly wait until Saturday to to see all of the color variations of January's block. Once everyone gets January's and February's blocks done, the comfort level of working with the three shapes will be easier and easier. My mantra for the year is FUN, FEARLESS, and FANTASTIC. We are working with the following shapes: hexagon, triangle, and diamond. The blocks are created and then appliqued on either a light or dark background fabric. Some students in the class are planning on using both light and dark backgrounds in the quilt. How fun is that! I'm sticking with the light background on mine but will utilize the dark background fabric in the borders.
Stay tuned....I'll post pictures after the class.
It is so Spring-like here in Oregon and everything is in grow mode and blooming. Today, we may reach 65 degrees! If we have the cold spell they are expecting mid March, it could be devastating. I heard that the local growers are already separating plants in an attempt to avoid massive losses. Not sure what I can do here at home, but I was gifted some large recyclable bags from my local pet store today so I have enough to at least cover my blueberry plants if needed.
Labels:
EPPclass,
Passing it On Challenge
Friday, January 30, 2015
Secrets and how hard it is to keep them!
Oh, how I am dying to share my new English paper piecing mystery block of the month with all of you!!! Each time I finished designing a block, I proclaimed it to be my favorite only to have the next design become my new favorite.
Are you like that too? Whatever you are working on at that particular moment is your all-time favorite? Between embroidering hats for customers and this block of the month, it's taken up nearly all of my time, but I've been having a blast.
The first class is tomorrow and I'm ready to get this project into the hands of willing participants. I promise to take photos as the year progresses. It will be fun to see all of the color variations for each block. The class is at Pioneer Quilts. I hope to see you there tomorrow!
The pictures below are of one of my ongoing projects. The quilt is a rendition of Sue Garman's Ruffled Roses that she created in 2011 for The Quilt Show. I redesigned the center block, swag borders, and corner blocks to make it fit my Christmas theme. Sue is one of my top 10 quilt designers because of her attention to detail. Her instructions are meticulous, and she is someone I dream of meeting in person one day.
Each year I proclaim that this IS THE YEAR for me to finish it. LOL Someday...someday....
And here a a couple of actions shots!
Note to all meat eaters -- don't forget to check back in in a few days for Monday's Recipe. You won't be disappointed!
Labels:
Christmas,
EPPclass,
Ruffled Roses
Wednesday, January 14, 2015
Insatiable Insanity
I made up the tiny hexagons by the baggy full with no direction of what I was going to do with them. It was the most addicting thing I've ever done. Every spare moment I had was spent making them. It was better than chocolate chip cookies and more addicting than potato chips. I had to force myself to stop and come up with a plan of action to join them. Out came the colored pencils and hexagon graph paper as I began to play with layout. What you see above was my favorite design I drew. I pushed myself even further by adding in the white flange to give more depth of the border area. This was not easy to do on such a small scale. My only negative remark from the judges was on my flange join and I already knew it. I must have done and redone that join 10 times and I just couldn't get it any smoother. I contemplated removing it entirely but I think it made the piece better even though the join was not perfect.
My Secret Garden's measurements is 10.5 inches by 11.625 inches. I didn't anticipate winning anything but really was looking forward to reading the judges comments. I was startled when I came around the corner and saw my little quilt hanging with two ribbons hanging on it that were bigger than it. It was and still is a thrill when I look at the quilt and ribbons.
I currently have several hexagon projects simultaneously going on right now. That simple shape has taken on a life of its own and it's been an amazing journey. This year I am teaching a Mystery English Paper Piecing block of the month. I've expanded the shape to include diamonds and triangles. I can hardly wait for the first class on January 31. I think no one could be more excited to share than I am. The funny thing is I am the worst and I mean the worst secret keeper. Christmas presents are nearly impossible for me to keep secret. I want to give it to the recipient as soon as I've wrapped it. I mean after all - it seems absurd to give the gift on the actual day it's supposed to be given. LOL It is killing me to not be able to share January's mystery block here right now!
To keep me from letting the cat out of the bag on my Mystery BOM, I'm sharing another of my hexagon projects. It's called the Insanity quilt. I'm making it using Civil War fabrics. I've seen pictures of this quilt made up in lots of different fabrics but never Civil War. I'm so loving this quilt. The hexagon size I chose for it is 5/8 inch. The designer used 1/2 inch but I wanted to grow the quilt to a size better suited for us. There will be over 10,000 hexagons in the finished quilt.
Here's how I stay organized color wise. My goal is to not have a repeat of the diamond shapes, but since I have to make 168 of these, I may have to cave and repeat.
Here are diamond units patiently waiting their turn. Hey, did I already mention that making these are totally addicting!
Tuesday, December 30, 2014
Happy New Year!
Only two more days before we all embark into a brand new year. A new year is just like a brand new journal...exciting, fresh, and so full of wonderful possibilities.
One of my goals for 2015 already has a fixed date. Beginning Saturday, January 31, I will be teaching an English Paper Piecing Mystery Block of the Month class. After all, who doesn't love a good mystery!
Designing the first two months has been exciting. Initially, my goal was to have the class use the hexagon shape only, but during the designing, I couldn't help but experiment with other shapes as well. After many hours of designing and redesigning, I settled on three shapes we will be using for the year: hexagon, diamond, and triangle. I chose a 3/4 inch size which I think is perfect....not too big and not too small.
The unfinished blocks measure 11 inches, and the class fee includes a choice of either a light or dark monthly background fabric. My first dilemma was that I could not decide on just one design for January. I liked both of them so much that I decided to include them both and allow the student to choose which they prefer. One block has fewer pieces and is lovely. The second choice looks more complicated but it is not. It just has more pieces. Both designs utilize all three shapes so no matter which you choose, you will start getting comfortable with the shapes right away.
The class will be at Pioneer Quilts which is located at 3101 S.E. Courtney Road, Portland, Oregon. This is near the Oak Grove/Milwaukie Area. You can call and sign up for the class if that is more convenient. The phone number is 503.654.1555. The class is scheduled to be the last Saturday of each month and will cost $10 each month. Class fee includes the design/designs for the month, choice of dark or light background fabric, and 'me.' We will go over last month's block, uncover the new block, and I will provide instructions for how I approached the block. As the year progresses, it will be wonderful to see all of the variations during show 'n tell. I'm so excited for this year-long journey!
I'm still working on the Christmas tablecloth. I'm so close to finishing the quilting that I almost can't stand it. I have incorporated a bit of machine free motion quilting on several areas that needed more quilting. These are areas where the quilting doesn't show up so it was a perfect opportunity to get some more practice improving my free motion. This is another goal for 2015 that must get more work because The Lady 'must' make her entrance.
I have a couple of new tools arriving soon that will enable me to post some short tutorials. In my last class a student mentioned how nice it would be to have handouts of some of the techniques we covered. Showing certain knots and such in paper form is not as easy as it sounds. What looks understandable to me because I know how to do it, looks undecipherable to someone just learning. However, posting a video showing the technique is much more doable and gives you the best of two worlds:
One of my goals for 2015 already has a fixed date. Beginning Saturday, January 31, I will be teaching an English Paper Piecing Mystery Block of the Month class. After all, who doesn't love a good mystery!
Designing the first two months has been exciting. Initially, my goal was to have the class use the hexagon shape only, but during the designing, I couldn't help but experiment with other shapes as well. After many hours of designing and redesigning, I settled on three shapes we will be using for the year: hexagon, diamond, and triangle. I chose a 3/4 inch size which I think is perfect....not too big and not too small.
The unfinished blocks measure 11 inches, and the class fee includes a choice of either a light or dark monthly background fabric. My first dilemma was that I could not decide on just one design for January. I liked both of them so much that I decided to include them both and allow the student to choose which they prefer. One block has fewer pieces and is lovely. The second choice looks more complicated but it is not. It just has more pieces. Both designs utilize all three shapes so no matter which you choose, you will start getting comfortable with the shapes right away.
The class will be at Pioneer Quilts which is located at 3101 S.E. Courtney Road, Portland, Oregon. This is near the Oak Grove/Milwaukie Area. You can call and sign up for the class if that is more convenient. The phone number is 503.654.1555. The class is scheduled to be the last Saturday of each month and will cost $10 each month. Class fee includes the design/designs for the month, choice of dark or light background fabric, and 'me.' We will go over last month's block, uncover the new block, and I will provide instructions for how I approached the block. As the year progresses, it will be wonderful to see all of the variations during show 'n tell. I'm so excited for this year-long journey!
I'm still working on the Christmas tablecloth. I'm so close to finishing the quilting that I almost can't stand it. I have incorporated a bit of machine free motion quilting on several areas that needed more quilting. These are areas where the quilting doesn't show up so it was a perfect opportunity to get some more practice improving my free motion. This is another goal for 2015 that must get more work because The Lady 'must' make her entrance.
I have a couple of new tools arriving soon that will enable me to post some short tutorials. In my last class a student mentioned how nice it would be to have handouts of some of the techniques we covered. Showing certain knots and such in paper form is not as easy as it sounds. What looks understandable to me because I know how to do it, looks undecipherable to someone just learning. However, posting a video showing the technique is much more doable and gives you the best of two worlds:
- You will always have access to the instructions (you don't have to worry about one more piece of paper to keep),
- You get to watch my hands and hear me describe the process so it's like having me their right with you at home.
I hope that you will let me know what you think when the videos go live.
And remember to follow Dillan's advice: "dive into the wind face first for the most fun and adventure!"
Labels:
2015,
EPPclass,
tablecloth
Subscribe to:
Posts (Atom)